The delegate of a closure is an object that is used to resolve references that cannot be resolved within the body of the closure itself. If your example was written like this instead:
def say ={def m ='hello'
println m
}
say.delegate=[m:2]
say()
It prints 'hello', because m can be resolved within the closure. However, when m is not defined within the closure,
def say ={
println m
}
say.delegate=[m:2]
say()
the delegate is used to resolve the reference, and in this case the delegate is a Map that maps mto 2.
It is possible to add methods onto interfaces with ExpandoMetaClass. To do this however, it MUST be enabled globally using the ExpandoMetaClass.enableGlobally() method before application start-up.
As an example this code adds a new method to all implementors of java.util.List:
List.metaClass.sizeDoubled = {-> delegate.size() * 2 }
def list = []
list << 1
list << 2assert4 == list.sizeDoubled()
Another example taken from Grails, this code allows access to session attributes using Groovy's subscript operator to all implementors of the HttpSession interface:
그루비에서는 변수 선언시에 정적 또는 동적 타이핑이 가능하다. 변수 선언시에 java 처럼 변수 타입을 명시하는 방법을 정적 타이핑이라 하고 def 키워드를 사용해 선언하는 방식을 동적 타이핑이라고 한다. 동적 타이핑의 경우 런타임시에 그루비가 해당 변수의 타입을 결정한다.
Operator Overloading
그루비에서 모든 연산자는 메소드 호출로 해석된다. 예를 들어 1+1 은 1.plus(1) 이라는 식으로 해석되는 것이다. 따라서 이런 메소드를 오버로드하면 연산자도 함께 오버할 수 있다.
Java 언어는 기본적으로 JVM(Java Virtual Machine) 위에서 실행되도록 고안된 언어입니다. 이번엔 JVM의 구조를 살펴보고 하나씩 점검해 보는 포스팅입니다.
1. Java Virtual Machine
A Java virtual machine (JVM) is an abstract computing machine. There are three notions of the JVM: specification, implementation, and instance. The specification is a book that formally describes what is required of a JVM implementation. Having a single specification ensures all implementations are interoperable. A JVM implementation is a computer program that meets the requirements of the JVM specification in a compliant and preferably performant manner. An instance of the JVM is a process that executes a computer program compiled into Java bytecode.
JVM이란 추상적인 컴퓨팅 머신입니다. 그리고 JVM에는 3가지 개념이 있습니다. 이것은 명세(스펙), 구현, 그리고 인스턴스입니다. 명세는 책입니다. JVM 구현에 무엇이 요구되는지 공식적으로 설명 되어 있습니다. 하나의 명세를 가지는 것은 모든 구현의 상호 운영을 보장합니다. JVM 구현은 JVM 명세의 요구에 맞춘 컴퓨터 프로그램입니다. JVM의 인스턴스는 자바 바이트코드로 컴파일된 컴퓨터 프로그램을 실행하는 프로세스입니다.
다이어그램상으로 위에서 아래로 내려가는 과정을 수행한다고 보면 됩니다. class 파일의 정보를 Class Loader를 사용해 JVM Memory 공간으로 옮기고 이것을 Execution Engine으로 실행하는 구조입니다.
그리고 새로운 단어들이 많이 등장합니다. 하나씩 살펴봅시다.
3. Class Loader
Class Loader(이하 "클래스 로더")는 클래스 파일 포맷(.class)을 준수하는 어떠한 것이라도 인지하고 적재할 수 있도록 구현해야 합니다. 그리고 런타임(Runtime)시에 클래스를 적재하고 바른 바이트코드로 작성되었는지 검사합니다.
또한 일반적으로 클래스 로더는 두 종류로 나뉩니다. 하나는 bootstrap class loader이고 다른 하나는 user define class loader입니다. 모든 JVM 구현은 반드시 bootstrap class loader가 있어야 합니다. 그리고 JVM 명세에서 클래스 로더가 클래스를 찾는 방법을 지정하지 않습니다.
4. JVM Memory(Runtime Data Areas)
JVM Memory는 Runtime Data Areas라고도 불립니다. 해당 공간에는 Method Area, Heap, JVM Language Stacks, PC Registers, Native Method Stacks 등으로 구성 되어 있습니다.
이 공간은 클래스 로더에 의해 데이터가 적재되는 공간입니다.
4.1. Method Area
Method Area(이하 "메소드 지역")은 Type(class, inteface) 데이터들을 가지고 있습니다. 다이어그램으로 보면 아래와 같습니다.
또한 각 Type 데이터에는 Runtime Constant Pool이라는 것을 가집니다. 이 곳은 심볼 테이블(symbol table)과 유사한 구조로 되어 있습니다. 상수 풀에는 해당 Type의 메소드, 필드, 문자열 상수등의 레퍼런스를 가지고 있습니다. 실제 물리적 메모리 위치를 참조할 때 사용합니다. 그리고 종종 바이트 코드를 메모리에 전부 올리기엔 크기 때문에 바이트 코드를 참조할 레퍼런스만 상수 풀에 저장하고 추후에 해당 값을 참조해서 실행할 바이트 코드를 찾아 메모리에 적재하게 하는 경우도 있습니다. 또한, 상수 풀을 사용함으로 동적 로딩(dynamic loading)이 가능합니다.
메소드 프레임(method frame)들이 JVM 스택에 하나씩 쌓이게 됩니다. 메소드 프레임은 간단하게 메소드라고 생각해도 됩니다. 스택 자료구조 형식이기 때문에 스택의 맨위에서부터 차례대로 메소드를 실행합니다. 또한 하나의 힙을 모든 스레드가 공유합니다. 하지만 각 스레드는 자신들만의 고유 JVM 스택을 가지고 있습니다.
4.4. PC Registers
PC는 Program Counter의 축약어입니다. 따라서 원래는 Program Counter Registers가 됩니다. 해당 영역은 현재 실행하고 있는 부분의 주소(adress)를 가지고 있습니다. 일반적으로 PC의 값은 현재 명령이 끝난 뒤에 값을 증가시킵니다. 그리고 해당하는 값의 명령을 실행하게 됩니다. 즉, 실행될 명령의 주소를 가지고 있습니다.
4.5. Native Method Stacks
일반적으로 JVM은 네이티브 방식을 지원합니다. 따라서 스레드에서 네이티브 방식의 메소드가 실행되는 경우 Native Method Stacks(이하 "네이티브 스택")에 쌓입니다. 일반적인 메소드를 실행하는 경우 JVM 스택에 쌓이다가 해당 메소드 내부에 네이티브 방식을 사용하는 메소드(예를 들면 C언어로 작성된 메소드)가 있다면 해당 메소드는 네이티브 스택에 쌓입니다.
5. Execution Engine
클래스 로더에 의해 JVM 메모리 공간에 적재된 바이트 코드를 Execution Engine(이하 "실행 엔진")을 이용해 실행합니다. 하지만 바이트 코드를 그대로 쓰는 것은 아니고 기계어로 변경한 뒤에 사용하게 됩니다. 해당 작업을 실행 엔진이 합니다. 그리고 바이트 코드를 기계어로 변경할 때엔 두 종류의 방식을 사용합니다. 각각 Interpreter와 JIT (Just-In-Time) compiler입니다.
Interpreter(이하 "인터프리터")는 우리가 알고 있는대로 방식대로 바이트 코드를 실행합니다. 하나의 명령어를 그때그때 해석해서 실행하게 되어 있습니다. JIT (Just-In-Time) compiler(이하 "JIT 컴파일러")는 인터프리터의 단점(성능,속도 등)을 보완하기 위해 도입되었습니다. 실행 엔진이 인터프리터를 이용해 명령어를 하나씩 실행하지만 JIT 컴파일러는 적정한 시간에 전체 바이트 코드를 네이티브 코드로 변경합니다. 이후에는 실행 엔진이 인터프리터 대신 네이티브로 컴파일된 코드를 실행합니다.
다만 JIT 컴파일러와 Java 컴파일러는 다른 것입니다. 다이어그램을 보면 이해가 빠를 것 같습니다.
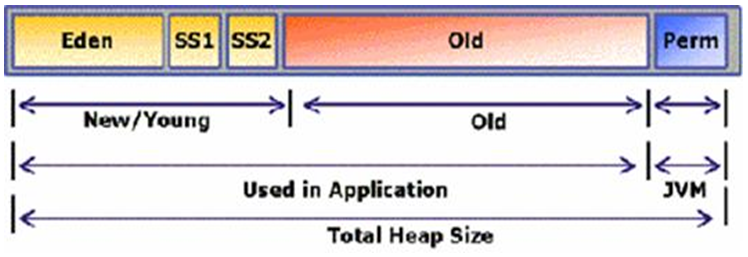
1. 자바 VM은 힙을 세개의 영역으로 나누어 사용한다. 1) New/Young 영역 : 새로 생성된 객체를 저장 2) Old 영역 : 만들어진지 오래된 객체를 저장 3) Permanent 영역 : JVM클래스와 메서드 객체를 저장
자바가 사용하는 메모리 구조
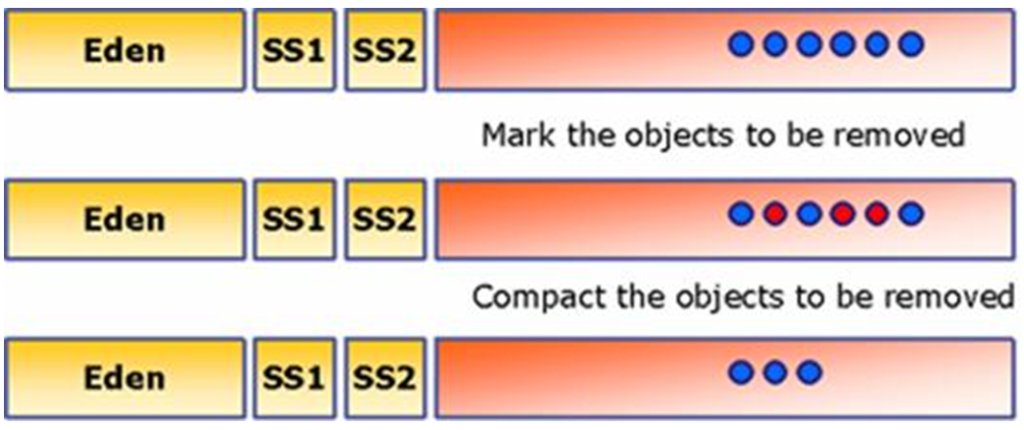
여기서 New 영역은 다시 a) Eden : 모든 새로 만들어진 객체를 저장 b) Survivor Space 1, Survivor Space 2 : Old 영역으로 넘어가기 전 객체들이 저장되는 공간 으로 구분된다.
2. Garbage Collector 자바 언어의 중요한 특징중 하나. 전통적인 언어의 경우 메모리를 사용한 뒤에는 일일이 메모리를 수거해 주어야 했다. 그러나, 자바 언어 에서는 GC기술을 사용하여 개발자로 하여금 메모리 관리에서 자유롭게 했다.
자바의 GC는 New/Young 영역과 Old 영역에 대해서만 GC를 수행한다. (Permanent 영역은 code가 올라가는 부분이기 때문에 GC가 필요없다.)
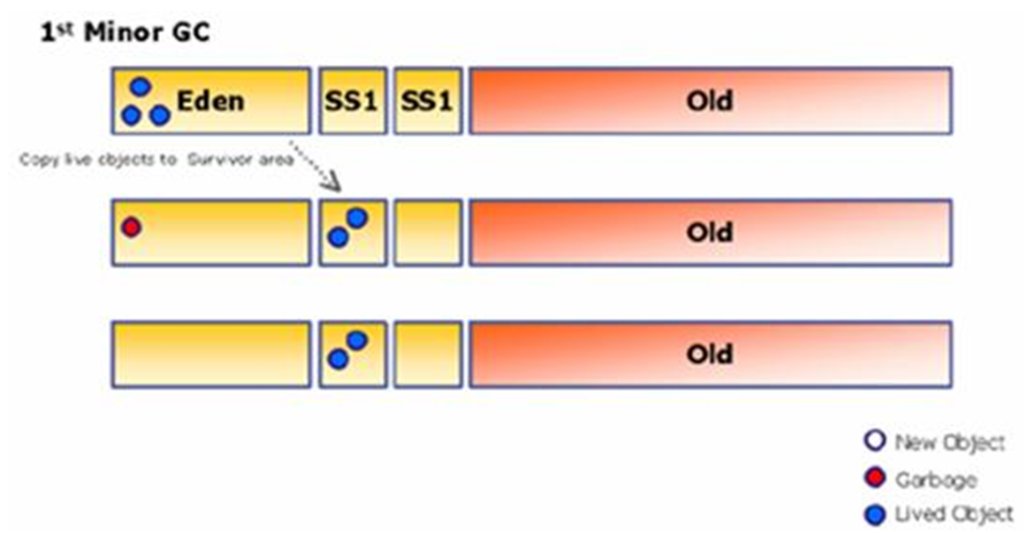
1) Minor GC New 영역의 GC를 Minor GC라고 부른다. New 영역은 Eden과 Survivor라는 두 영역으로 구분된다. Eden 영역은 자바 객체가 생성 되자 마자 저장이 되는 곳이다. 이곳의 객체가 Minor GC가 발생할 때 Survivor 영역으로 이동된다.
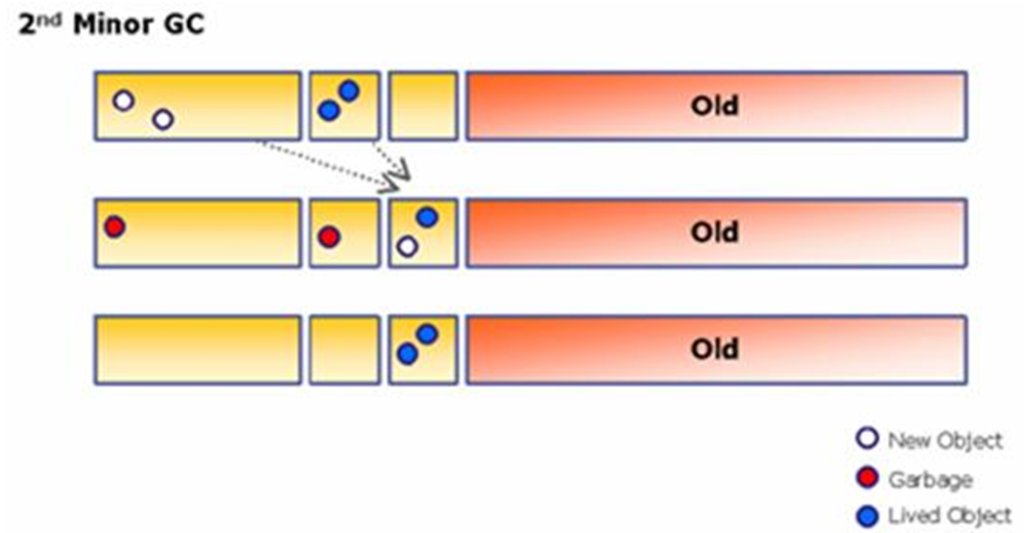
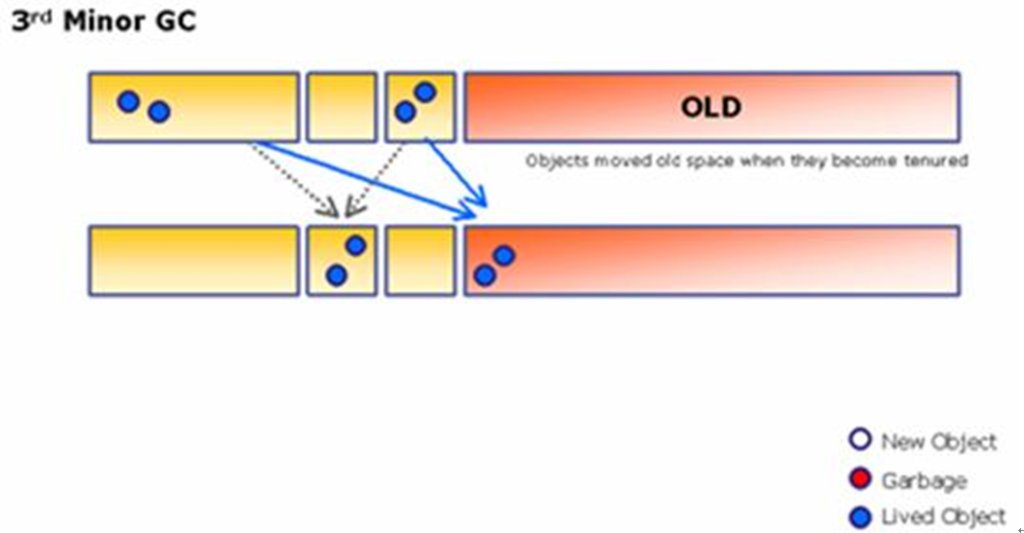
Survivor 영역은 Survivor1 과 Survivor2로 나뉘어 지는데, Minor GC가 발생하면 Eden과 Survivor1에 살아있는 객체가 Survivor2로 이동되고, Eden 영역과 Survivor1 영역에 남아있는(죽어있는) 객체는 clear된다. 결과적으로, 현재 살아있는 객체들만 Survivor2에 남아있게 된다. 다음번 Minor GC가 발생되면 같은 원리로, Eden과 Survivor2의 살아있는 객체가 Survivor1으로 이동되고, 두 영역은 Clear 된다. 이와 같은 방법으로 반복되면서 메모리를 수거한다. 이런 방식의 GC알고리즘을 Copy & Scavenge라고 한다. 속도가 빠르며 작은 크기의 메모리를 collecting 하는데 효과적이다. Minor GC 과정중 오래된 객체는 Old 영역으로 복사된다. (Kein:그런데 얼마나 지나야 '오래된' 객체인 것인지는 명확히 모르겠네요)
새로 생성된 객체가 Eden 영역에 있다가 Minor GC가 일어난다. 살아있는 객체(파란색)가 SS1으로 옮겨지고 죽은객체(빨간색)는 그대로 남겨진다. 이후 Eden과 SS2를 clear 한다.
Eden에 새로 생성된 객체와 SS1에 있는 살아있는 객체를 SS2로 옮기고, Eden과 SS1 을 clear 한다.
생성된지 오래된 객체를 Old 영역으로 이동한다.
2) Full GC Old 영역의 GC를 Full GC라 한다. Mark & Compact 알고리즘을 이용하는데, 전체 객체들의 reference를 따라가면서 연결이 끊긴 객체를 marking 한다. 이 작업이 끝나면 사용되지 않는 객체가 모두 mark 되고, 이 객체들을 삭제한다. 실제로는 삭제가 아니라, mark 된 객체로 생기는 부분을 unmark된, 즉 사용중인 객체로 메꾸는 방법이다.
Full GC는 속도가 매우 느리며, Full GC가 일어나는 도중에 순간적으로 java application이 멈춰버리기 때문에 Full GC가 일어나는 정도와 Full GC에 소요되는 시간은 application의 성능과 안정성에 매우 큰 영향을 미치게 된다.
Full GC 동작 순서
3. Garbage Collection이 중요한 이유 Minor GC는 보통 0.5초 이내에 끝나기 때문에 큰 문제가 되지 않는다. 하지만, Full GC의 경우 보통 수 초가 소요되고, GC동안 Application이 멈추기 때문에 문제가 될 수 있다. 5초 동안 서버가 멈춘다면, 멈춰있는 동안 사용자의 request는 쇄도하게 되고, queue에 저장되었다가 요청이 한꺼번에 들어오게되면 여러 장애를 발생할 수 있게 된다. 원할한 서비스를 위해서 GC를 어떻게 일어나게 하느냐가 시스템의 안정성과 성능에 변수로 작용하게 된다.
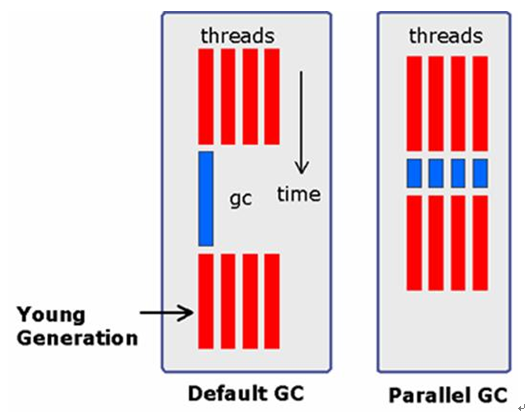
4. Garbage Collection 알고리즘들 1) Default Collector 위에 설명한 전통적인 GC방법으로 Minor GC에 Scavenge를, Full GC에 Mark & Compact를 사용하는 방법이다.
2) Parallel GC JDK 1.3까지는 하나의 thread 에서만 GC가 수행되었다. JDK 1.4 부터 지원되는 parallel gc 는 minor gc를 동시에 여러개의 thread 를 이용해서 수행하는 방법으로 하나의 thread 에서 gc를 수행하는 것보다 빠른 gc를 수행한다.
하지만, parallel gc가 언제나 유익한 것은 아니다. 1 CPU에서는 오히려 parallel gc 가 느리다. multi thread에 대한 지원이나 계산등을 위해서 4CPU의 256M 정도의 메모리를 보유한 시스템에서 유용하게 사용된다. parallel gc 는 두가지 옵션을 제공하는데, Low-Pause 방식과 Throughput 방식이다. solaris 기준으로 Low-pause 방식은 ?XX:+UseParNewGC 옵션을 사용한다. Old GC를 수행할 때 Application 이 멈추는 현상을 최소화 하는데 역점을 두었다. Throughput 방식은 ?XX:+UseParallelGC 옵션을 사용하며, Old 영역을 GC할때는 기본 옵션을 사용하며 Minor GC가 발생했을 때 최대한 빨리 수행되도록 throughput에 역점을 둔 방식이다.
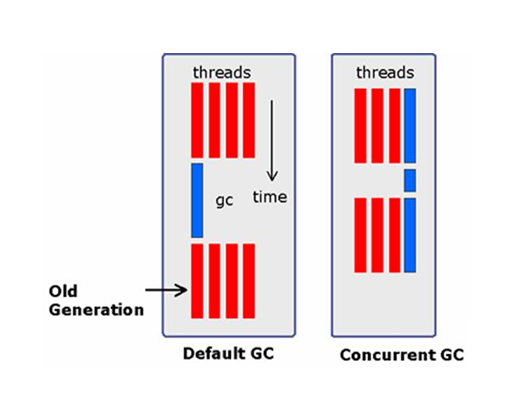
3) Concurrent GC Full GC를 하는 동안 시간이 길고, Application이 순간적으로 멈추는 현상이 발생하는 단점을 보완하기 위해서, Full GC에 의해 Application이 멈추는 현상을 최소화 하기 위한 방법이다. Full GC에 소요되는 작업을 Application을 멈추고 하는것이 아니라, 일부는 Application을 수행하고, Application이 멈추었을때 최소한의 작업만을 GC에 할당하는 방법으로 Application이 멈추는 시간을 최소화 한다.
Application이 수행중 일 때 (붉은라인) Full GC를 위한 작업을 수행한다. Application이 멈춘 시간동안에는 일부분의 작업을 수행하기 때문에 기존 Default 방법보다 멈추는 시간이 현저하게 줄어든다. solaris JVM 에서는 -XX:+UseConcMarkSweepGC 옵션을 사용한다.
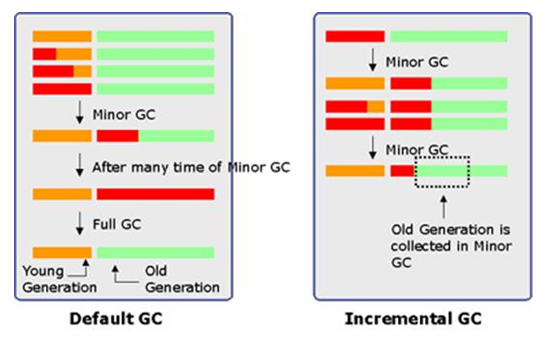
4) Incremental GC (Train GC) Incremental GC 또는 Train GC 라고 불리우는 방법은 JDK 1.3 부터 지원된 방법이다. 의도 자체는 Full GC 동안 Application이 멈추는 시간을 최소화 하는데 목적이 있다. Minor GC가 일어날 때 마다 Old 영역을 조금씩 GC를 해서, Full GC가 발생하는 횟수나 시간을 줄이는 방법이다.
그림에서 보듯,왼쪽의 Default GC는 Full GC가 일어난 후에나 Old 영역이 Clear된다. 그러나, 오른쪽의 Incremental GC를 보면 Minor GC가 일어난후에, Old 영역이 일부 Collect된것을 알 수 있다. Incremental GC를 사용하는 방법은 JVM 옵션에 ?Xinc 옵션을 사용하면 된다. Incremental GC는 많은 자원을 소모하고, Minor GC를 자주일으키며, Incremental GC를 사용한다고 Full GC가 없어지거나 그 횟수가 획기적으로 줄어드는 것은 아니다. 오히려 느려지는 경우가 많다.
5. GC 로그 수집 및 분석 방법 이제 적군에 대해 알았으니 나 자신을 파악할 차례다. 내 Application의 gc 동태를 파악하기 위해 java 실행 옵션에 -verbose:gc 옵션을 주면 gc 로그를 출력할 수 있다.
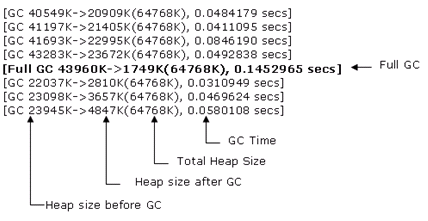
garbage collection 로그
로그중 GC 는 Minor GC 이고, Full GC는 Full GC를 나타낸다. 그 뒤의 숫자는 GC수행 전 heap 메모리 사용량 이다. (New + Old + Perm 영역) 그뒤 -> 이후의 숫자는 GC 수행 후 heap 메모리 사용량을 나타낸다. Minor GC 가 수행된 뒤에는 Eden 과 Survivor 영역의 GC가 수행된 것이며, GC이후 heap 사용량은 Old영역의 용량과 유사하다. 괄호 안의 Total Heap Size 는 현재 jvm 이 사용하는 Heap memory의 양이다. 이 크기는 java 실행 옵션의 -Xms -Xmx 옵션으로 설정이 가능한데, 예를 들어 -Xms512 -Xmx1024로 해 놓으면 jvm는 메모리 사용량에 따라서 512~1024m 사이에서 적절하게 메모리 사용량을 늘였다 줄였다 하며 동작한다. 그 다음값은 gc에 소요된 시간이다.
위의 로그를 보면, Minor GC가 일어날 때 마다 약 20,000Kbytes 정도의 collection이 일어난다. Minor GC는 Eden과 survivor 영역 하나를 gc 하는 것이기 때문에 New 영역을 20,000Kbyte 정도로 생각할 수 있다. Full GC 때를 보면 약 44,000Kbytes 에서 1,749Kbytes 로 줄어든 것을 볼 수 있다. Old 영역에 큰 데이터가 많지 않은 경우이다. Data를 많이 사용하는 Application의 경우 전체 Heap 이 512M 라 할 때, Full GC 후에도 480M 정도로 유지되는 경우가 있다. 이런 경우에는 실제로 Application이 메모리를 많이 사용하는 경우라고 판단할 수 있기 때문에, 전체 Heap 메모리를 늘려주면 효과적이다.
Part I: An Overview of Java Classloaders, Delegation and Common Problems
In this part, we provide an overview of classloaders, explain how delegation works and examine how to solve common problems that Java developers encounter with classloaders on a regular basis.
Introduction: Why you should know, and fear, Classloaders
Classloaders are at the core of the Java language. Java EE containers, OSGi, various web frameworks and other tools use classloaders heavily. Yet, something goes wrong with classloading, would you know how to solve it?
Join us for a tour of the Java classloading mechanism, both from the JVM and developer point-of-view. We will look at typical problems related to classloading and how to solve them. NoClassDefFoundError, LinkageError and many others are symptoms of specific things going wrong that you can usually find and fix. For each problem, we’ll go through an example with a corresponding solution. We’ll also take a look at how and why classloaders leak and how can that be remedied.
And for dessert, we review how to reload a Java class using a dynamic classloader. To get there we’ll see how objects, classes and classloaders are tied to each other and the process required to make changes. We begin with a bird’s eye view of the problem, explain the reloading process, and then proceed to a specific example to illustrate typical problems and solutions.
Enter java.lang.ClassLoader
Let’s dive into the beautiful world of classloader mechanics.
It’s important to realize that each classloader is itself an object–an instance of a class that extends java.lang.ClassLoader. Every class is loaded by one of those instances and developers are free to subclass java.lang.ClassLoader to extend the manner in which the JVM loads classes.
There might be a little confusion: if a classloader has a class and every class is loaded by a classloader, then what comes first? We need an understanding of the mechanics of a classloader (by proxy of examining its API contract) and the JVM classloader hierarchy.
First, here is the API, with some less relevant parts omitted:
package java.lang;
publicabstractclassClassLoader{
public Class loadClass(String name);
protected Class defineClass(byte[] b);
public URL getResource(String name);
public Enumeration getResources(String name);
public ClassLoader getParent()
}
By far, the most important method of java.lang.ClassLoader is the loadClass method, which takes the fully qualified name of the class to be loaded and returns an object of class Class.
The defineClass method is used to materialize a class for the JVM. The byte array parameter ofdefineClass is the actual class byte code loaded from disk or any other location.
What if you no longer had to redeploy your Java code to see changes? The choice is yours. In just a few clicks you can Say Goodbye to Java Redeploys forever.
getResource and getResources return URLs to actually existing resources when given a name or a path to an expected resource. They are an important part of the classloader contract and have to handle delegation the same way as loadClass – delegating to the parent first and then trying to find the resource locally. We can even view loadClass as being roughly equivalent todefineClass(getResource(name).getBytes()).
The getParent method returns the parent classloader. We’ll have a more detailed look at what that means in the next section.
The lazy nature of Java has an effect on how do classloaders work – everything should be done at the last possible moment. A class will be loaded only when it is referenced somehow – by calling a constructor, a static method or field.
Now let’s get our hands dirty with some real code. Consider the following example: class A instantiates class B.
publicclassA{
publicvoiddoSomething(){
B b = new B();
b.doSomethingElse();
}
}
The statement B b = new B() is semantically equivalent to B b = A.class.getClassLoader().loadClass(“B”).newInstance()
As we see, every object in Java is associated with its class (A.class) and every class is associated with classloader (A.class.getClassLoader()) that was used to load the class.
When we instantiate a ClassLoader, we can specify a parent classloader as a constructor argument. If the parent classloader isn’t specified explicitly, the virtual machine’s system classloader will be assigned as a default parent. And with this note, let’s examine the classloader hierarchy of a JVM more closely.
자바는 동적으로 클래스를 읽어온다. 즉, 런타임에 모든 코드가 JVM에 링크된다. 모든 클래스는 그 클래스가 참조되는 순간에 동적으로 JVM에 링크되며, 메모리에 로딩된다. 자바의 런타임 라이브러리([JDK 설치 디렉토리]/jre/lib/rt.jar) 역시 예외가 아니다. 이러한 동적인 클래스 로딩은 자바의 클래스로더 시스템을 통해서 이루어지며, 자바가 기본적으로 제공하는 클래스로더는 java.lang.ClassLoader를 통해서 표현된다. JVM이 시작되면, 부트스트랩(bootstrap) 클래스로더를 생성하고, 그 다음에 가장 첫번째 클래스인 Object를 시스템에 읽어온다.
런타임에 동적으로 클래스를 로딩하다는 것은 JVM이 클래스에 대한 정보를 갖고 있지 않다는 것을 의미한다. 즉, JVM은 클래스의 메소드, 필드, 상속관계 등에 대한 정보를 알지 못한다. 따라서, 클래스로더는 클래스를 로딩할 때 필요한 정보를 구하고, 그 클래스가 올바른지를 검사할 수 있어야 한다. 만약 이것을 할 수 없다면, JVM은 .class 파일의 버전이 일치하지 않을 수 있으며, 또한 타입 검사를 하는 것이 불가능할 것이다. JVM은 내부적으로 클래스를 분석할 수 있는 기능을 갖고 있으며, JDK 1.1부터는 개발자들이 리플렉션(Reflection)을 통해서 이러한 클래스의 분석을 할 수 있도록 하고 있다.
로드타임 동적 로딩(load-time dynamic loading)과 런타임 동적 로딩(run-time dynamic loading)
클래스를 로딩하는 방식에는 로드타임 동적 로딩(load-time dynamic loading)과 런타임 동적 로딩(run-time dynamic loading)이 있다. 먼저 로드타임 동적 로딩에 대해서 알아보기 위해 다음과 코드를 살펴보자.
public class HelloWorld { public static void main(String[] args) { System.out.println("안녕하세요!"); } }
HelloWorld 클래스를 실행하였다고 가정해보자. 아마도, 명령행에서 다음과 같이 입력할 것이다.
$ java HelloWorld
이 경우, JVM이 시작되고, 앞에서 말했듯이 부트스트랩 클래스로더가 생성된 후에, 모든 클래스가 상속받고 있는 Object 클래스를 읽어온다. 그 이후에, 클래스로더는 명령행에서 지정한 HelloWorld 클래스를 로딩하기 위해, HelloWorld.class 파일을 읽는다. HelloWorld 클래스를 로딩하는 과정에서 필요한 클래스가 존재한다. 바로 java.lang.String과 java.lang.System이다. 이 두 클래스는 HelloWorld 클래스를 읽어오는 과정에서, 즉 로드타임에 로딩된다. 이 처럼, 하나의 클래스를 로딩하는 과정에서 동적으로 클래스를 로딩하는 것을 로드타임 동적 로딩이라고 한다.
이제, 런타임 동적 로딩에 대해서 알아보자. 우선, 다음의 코드를 보자.
public class HelloWorld1 implements Runnable { public void run() { System.out.println("안녕하세요, 1"); } } public class HelloWorld2 implements Runnable { public void run() { System.out.println("안녕하세요, 2"); } }
이 두 클래스를 Runnable 인터페이스를 구현한 간단한 클래스이다. 이제 실제로 런타임 동적 로딩이 일어나는 클래스를 만들어보자.
public class RuntimeLoading { public static void main(String[] args) { try { if (args.length < 1) { System.out.println("사용법: java RuntimeLoading [클래스 이름]"); System.exit(1); } Class klass = Class.forName(args[0]); Object obj = klass.newInstance(); Runnable r = (Runnable) obj; r.run(); } catch(Exception ex) { ex.printStackTrace(); } } }
위 코드에서, Class.forName(className)은 파리미터로 받은 className에 해당하는 클래스를 로딩한 후에, 그 클래스에 해당하는 Class 인스턴스(로딩한 클래스의 인스턴스가 아니다!)를 리턴한다. Class 클래스의 newInstance() 메소드는 Class가 나타내는 클래스의 인스턴스를 생성한다. 예를 들어, 다음과 같이 한다면 java.lang.String 클래스의 객체가 생성된다.
Class klass = Class.forName("java.lang.String"); Object obj = klass.newInstance();
따라서, Class.forName() 메소드가 실행되기 전까지는 RuntimeLoading 클래스에서 어떤 클래스를 참조하는 지 알수 없다. 다시 말해서, RuntimeLoading 클래스를 로딩할 때는 어떤 클래스도 읽어오지 않고, RuntimeLoading 클래스의 main() 메소드가 실행되고 Class.forName(args[0])를 호출하는 순간에 비로서 args[0]에 해당하는 클래스를 읽어온다. 이처럼 클래스를 로딩할 때가 아닌 코드를 실행하는 순간에 클래스를 로딩하는 것을 런타임 동적 로딩이라고 한다.
다음은 RuntimeLoading 클래스를 명령행에서 실행한 결과를 보여주고 있다.
$ java RuntimeLoading HelloWorld1 안녕하세요, 1
Class.newInstance() 메소드와 관련해서 한 가지 알아둘 점은 해당하는 클래스의 기본생성자(즉, 파라미터가 없는)를 호출한다는 점이다. 자바는 실제로 기본생성자가 코드에 포함되어 있지 않더라도 코드를 컴파일할 때 자동적으로 기본생성자를 생성해준다. 이러한 기본생성자는 단순히 다음과 같이 구성되어 있을 것이다.
public ClassName() { super(); }
ClassLoader
자바는 클래스로더를 사용하고, 클래스를 어떻게 언제 JVM으로 로딩하고, 언로딩하는지에 대한 특정한 규칙을 갖고 있다. 이러한 규칙을 이해해야, 클래스로더를 좀 더 유용하게 사용할 수 있으며 개발자가 직접 자신만의 커스텀 클래스로더를 작성할 수 있게 된다.
클래스로더의 사용
이 글을 읽는 사람들은 거의 대부분은 클래스로더를 프로그래밍에서 직접적으로 사용해본 경험이 없을 것이다. 클래스로더를 사용하는 것은 어렵지 않으며, 보통의 자바 클래스를 사용하는 것과 완전히 동일하다. 다시 말해서, 클래스로더에 해당하는 클래스의 객체를 생성하고, 그 객체의 특정 메소드를 호출하기만 하면 된다. 간단하지 않은가? 다음의 코드를 보자.
ClassLoader cl = . . . // ClassLoader의 객체를 생성한다. Class klass = null; try { klass = cl.loadClass("java.util.Date"); } catch(ClassNotFoundException ex) { // 클래스를 발견할 수 없을 경우에 발생한다. ex.printStackTrace(); }
일단 클래스로더를 통해서 필요한 클래스를 로딩하면, 앞의 예제와 마찬가지로 Class 클래스의 newInstance() 메소드를 사용하여 해당하는 클래스의 인스턴스를 생성할 수 있게 된다. 형태는 다음과 같다.
위 코드를 보면, Class.newInstance()를 호출할 때 몇개의 예외와 에러가 발생하는 것을 알 수 있다. 이것들에 대한 내용은 Java API를 참고하기 바란다.
자바 2의 클래스로더
자바 2 플랫폼에서 클래스로더의 인터페이스와 세만틱(semantic)은 개발자들이 자바 클래스로딩 메커니즘을 빠르고 쉽게 확장할 수 있도록 하기 위해 몇몇 부분을 재정의되었다. 그 결과로, 1.1이나 1.0에 맞게 작성된 (커스텀 클래스로더를 포함한) 클래스로더는 자바 2 플랫폼에서는 제기능을 하지 못할 수도 있으며, 클래스로더 사용하기 위해 작성했던 코드를 재작성하는 것이 그렇게 간단하지만은 않다.
자바 1.x와 자바 2에서 클래스로더에 있어서 가장 큰 차이점은 자바 2의 클래스로더는 부모 클래스로더(상위 클래스가 아니다!)를 갖고 있다는 점이다. 자바 1.x의 클래스로더와는 달리, 자바 2의 클래스로더는 부모 클래스로더가 먼저 클래스를 로딩하도록 한다. 이를 클래스로더 딜리게이션 모델(ClassLoader Delegation Model)이라고 하며, 이것이 바로 이전 버전의 클래스로더와 가장 큰 차이점이다.
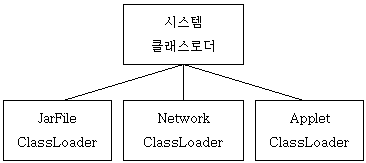
자바 2의 클래스로더 딜리게이션 모델에 대해 구체적으로 알아보기 위해 로컬파일시스템과 네트워크로부터 클래스를 읽어와야 할 필요가 있다고 가정해보자. 이 경우, 쉽게 로컬파일시스템의 jar 파일로부터 클래스를 읽어오는 클래스로더와 네트워크로부터 클래스를 읽어오는 클래스로더가 필요하다는 것을 생각할 수 있다. 이 두 클래스로더를 각각 JarFileClassLoader와 NetworkClassLoader라고 하자.
JDK 1.1에서, 커스텀 클래스로더를 만들기 위해서는 ClassLoader 클래스를 상속받은 후에 loadClass() 메소드를 오버라이딩하고, loadClass() 메소드에서 바이트코드를 읽어온 후, defineClass() 메소드를 호출하면 된다. 여기서 defineClass() 메소드는 읽어온 바이트코드로부터 실제 Class 인스턴스를 생성해서 리턴한다. 예를 들어, JarFileClassLoader는 다음과 같은 형태를 지닐 것이다.
public class JarFileClassLoader extends ClassLoader { ... private byte[] loadClassFromJarFile(String className) { // 지정한 jar 파일로부터 className에 해당하는 클래스의 // 바이트코드를 byte[] 배열로 읽어온다. .... return byteArr; }
public synchronized class loadClass(String className, boolean resolveIt) throws ClassNotFoundException {
Class klass = null;
// 클래스를 로드할 때, 캐시를 사용할 수 있다. klass = (Class) cache.get(className);
if (klass != null) return klass;
// 캐시에 없을 경우, 시스템 클래스로더로부터 // 지정한 클래스가 있는 지 알아본다. try { klass = super.findSystemClass(className); return klass; } catch(ClassNotFoundException ex) { // do nothing }
// Jar 파일로부터 className이 나타내는 클래스를 읽어온다. byte[] byteArray = loadClassFromJarFile(className); klass = defineClass(byteArray, 0, byteArray.length); if (resolve) resolveClass(klass); cache.put(className, klass); // 캐시에 추가 return klass; } }
위의 개략적인 코드를 보면, 시스템 클래스로더에게 이름이 className인 클래스가 존재하는 지 요청한다. (여기서 시스템 클래스로더 또는 primordial 시스템 클래스로더는 부트스트랩 클래스로더이다). 그런 후에, 시스템 클래스로더로부터 클래스를 읽어올 수 없는 경우 Jar 파일로부터 읽어온다. 이 때, className은 완전한 클래스 이름(qualified class name; 즉, 패키지이름을 포함한)이다. NetworkClassLoader 클래스 역시 이 클래스와 비슷한 형태로 이루어져 있을 것이다. 이 때, 시스템 클래스로더와 그 외의 다른 클래스로더와의 관계는 다음 그림과 같다.
위 그림을 보면, 각각의 클래스로더는 오직 시스템 클래스로더와 관계를 맺고 있다. 다시 말해서, JarFileClassLoader는 NetworkClassLoader나 AppletClassLoader와는 관계를 맺고 있지 않다. 이제, A라는 클래스가 내부적으로 B라는 클래스를 사용한다고 가정해보자. 이 때, 만약 A 클래스는 네트워크를 통해서 읽어오고, B라는 클래스는 Jar 파일을 통해서 읽어와야 한다면? 이 경우에 어떻게 해야 하는가? 쉽사리 해결책이 떠오르지 않을 것이다. 이러한 문제는 JarFileClassLoader와 NetworkClassLoader 간에 유기적인 결합을 할 수 없기 때문에 발생한다.
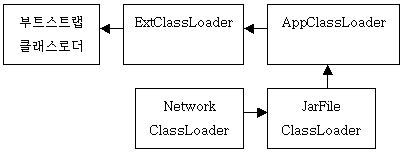
자바 2에서는 이러한 문제를 클래스로더 딜리게이션 모델을 통해서 해결하고 있다. 즉, 특정 클래스로더 클래스를 읽어온 클래스로더(이를 부모 클래스로더라고 한다)에게 클래스 로딩을 요청하는 것이다. 다음의 그림을 보자.
이 그림은 자바 2에서 클래스로더간의 관계를 보여주고 있다. 이 경우, NetworkClassLoader 클래스는 JarFileClassLoader가 로딩하고, JarFileClassLoader 클래스는 AppClassLoader가 로딩하였음을 보여준다. 즉, JarFileClassLoader는 NetworkClassLoader의 부모 클래스로더가 되고, AppClassLoader는 JarFileClassLoader의 부모 클래스로더가 되는 것이다.
이 경우, 앞에서 발생했던 문제가 모두 해결된다. A 클래스가 필요하면, 가장 먼저 NetworkClassLoader에 클래스로딩을 요청한다. 그럼, NetworkClassLoader는 네트워크로부터 A 클래스를 로딩할 수 있으므로, A 클래스를 로딩한다. 그런 후, A 클래스는 B 클래스를 필요로 한다. B 클래스를 로딩하기 위해 NetworkClassLoader는 JarFileClassLoader에 클래스 로딩을 위임(delegation)한다. JarFileClassLoader는 Jar 파일로부터 B 클래스를 읽어온 후 NetworkClassLoader에게 리턴할 것이며, 따라서 NetworkClassLoader는 Jar 파일에 있는 B 클래스를 사용할 수 있게 된다. 앞의 JDK 1.1에서의 클래스로더 사이의 관계에 비해 훨씬 발전적인 구조라는 것을 알 수 있다.
앞에서 말했듯이, 자바 2에서는 몇몇 클래스로더 메커니즘을 재정의하였다. 이 때문에, JDK 1.1에서의 클래스로더에 관한 몇몇개의 규칙이 깨졌다. 먼저, loadClass() 메소드를 더 이상 오버라이딩(overriding) 하지 않고, 대신 findClass()를 오버라이딩한다. loadClass() 메소드는 public에서 protected로 변경되었으며, 실제 JDK1.3의 ClassLoader 클래스의 소크 코드를 보면 다음과 같이 정의되어 있다.
// src/java/lang/ClassLoader.java public abstract class ClassLoader { /* * The parent class loader for delegation. */ private ClassLoader parent;
protected synchronized Class loadClass(String name, boolean resolve) throws ClassNotFoundException { // First, check if the class has already been loaded Class c = findLoadedClass(name); if (c == null) { try { if (parent != null) { c = parent.loadClass(name, false); } else { c = findBootstrapClass0(name); } } catch (ClassNotFoundException e) { // If still not found, then call findClass in order // to find the class. c = findClass(name); } } if (resolve) { resolveClass(c); } return c; } .... }
위 코드를 보면 부모 클래스로더로부터 먼저 클래스 로딩을 요청하고, 그것이 실패할 경우(즉, catch 블럭)에 비로소 직접 클래스를 로딩한다. 여기서 그렇다면 부모 클래스는 어떻게 결정되는 지 살펴보자. 먼저 JDK 1.3의 ClassLoader 클래스는 다음과 같은 두 개의 생성자를 갖고 있다.
이 두 코드를 살펴보면, 부모 클래스로더를 지정하지 않을 경우, 시스템 클래스로더를 부모 클래스로더로 지정하는 것을 알 수 있다. 따라서 커스텀 클래스로더에서 부모 클래스로더를 지정하기 위해서는 다음과 같이 하면 된다.
public class JarFileClassLoader extends ClassLoader { public JarFileClassLoader () { super(JarFileClassLoader.class.getClassLoader()); // 다른 초기화 관련 사항 } .... public Class findClass(String name) { // 지정한 클래스를 찾는다. } }
모든 클래스는 그 클래스에 해당하는 Class 인스턴스를 갖고 있다. 그 Class 인스턴스의 getClassLoader() 메소드를 통해서 그 클래스를 로딩한 클래스로더를 구할 수 있다. 즉, 위 코드는 JarFileClassLoader 클래스를 로딩한 클래스로더를 JarFileClassLoader 클래스로더의 부모 클래스로더로 지정하는 것이다. (실제로 커스텀 클래스로더를 구현하는 것에 대한 내용은 이 Article의 시리중에서 3번째에 알아보기로 한다).
JVM에서 부모 클래스로더를 갖지 않은 유일한 클래스로더는 부트스트랩 클래스로더이다. 부트스트랩 클래스로더는 자바 런타임 라이브러리에 있는 클래스를 로딩하는 역할을 맡고 있으며, 항상 클래스로더 체인의 가장 첫번째에 해당한다. 기본적으로 자바 런타임 라이브러리에 있는 모든 클래스는 JRE/lib 디렉토리에 있는 rt.jar 파일에 포함되어 있다.
결론
이번 Article에서는 자바에서 클래스 로딩이 동적으로 이루어지면, 클래스 로딩 방식에서는 로드타임 로딩과 런타임 로딩의 두 가지 방식이 있다는 것을 배웠다. 그리고 자바 2에서의 클래스로딩이 클래스로더 딜리게이션 모델(Classloader Delegation Model)을 통해서 이루어진다는 점과 이 모델에 자바 1.x에서의 클래스로딩 메커니즘과 어떻게 다르며, 어떤 장점이 있는 지 알아보았다. 다음 Article에서는 자바 2에서 기본적으로 제공하는 클래스로더에 대해서 알아보기로 한다.
// src/java/lang/ClassLoader.java public abstract class ClassLoader { /* * The parent class loader for delegation. */ private ClassLoader parent;
protected synchronized Class loadClass(String name, boolean resolve) throws ClassNotFoundException { // First, check if the class has already been loaded Class c = findLoadedClass(name); if (c == null) { try { if (parent != null) { c = parent.loadClass(name, false); } else { c = findBootstrapClass0(name); } } catch (ClassNotFoundException e) { // If still not found, then call findClass in order // to find the class. c = findClass(name); } } if (resolve) { resolveClass(c); } return c; } .... }
코드 5를보면, 부모클래스로더를지정하지않을경우에는시스템클래스로더를부모클래스로더로지정하고있습니다. 커스텀클래스로더에서부모클래스로더를지정하기위해서는코드 6과같이하면됩니다.
public class JarFileClassLoader extends ClassLoader { public JarFileClassLoader () { super(JarFileClassLoader.class.getClassLoader()); // 다른초기화관련사항 } .... public Class findClass(String name) { // 지정한클래스를찾는다. } }
코드 6.
모든클래스는그클래스에해당하는 Class 인스턴스를가지고있습니다. 그 Class 인스턴스의 getClassLoader() 메소드를통해서그클래스를로딩한클래스로더를구할수있습니다. 코드 6에서는 JarFileClassLoader 클래스를로딩한클래스로더를 JarFileClassLoader 클래스로더의부모클래스로더로지정하는것입니다. JVM에서부모클래스로더를갖지않은유일한클래스로더는부트스트랩클래스로더로서부트스트랩클래스로더는자바런타임라이브러리에있는클래스를로딩하는역할을맡고있으며, 항상클래스로더체인의첫번째에해당합니다. Java에서는같은클래스일지라도다른클래스로더에의해서로딩되었다면다른클래스로구분이됩니다.
Example
public class ToolsJarLoader extends URLClassLoader {
private static ToolsJarLoader mInstance;
public static ToolsJarLoader getInstance() {
if(mInstance == null) {
mInstance = new ToolsJarLoader(((URLClassLoader)ClassLoader.getSystemClassLoader()).getURLs());
}
return mInstance;
}
public ToolsJarLoader(URL[] urls) {
super(urls);
}
@Override
public void addURL(URL url) {
super.addURL(url);
}
public boolean isLoaded(URL url) {
URL[] urls = getURLs();
for(URL temp : urls) {
if(temp.equals(url)) {
return true;
}
}
return false;
}
}
코드 7.
코드 7은원하는클래스및 jar를런타임에동적으로로드하기위한클래스로더이다. addURL을통해 jar 및클래스를로딩한다.
URL jarUrl = new File(toolsJarPath).toURI().toURL();
class HelloWorld1 implements Runnable { public void run() { System.out.println("안녕하세요, 1"); } } class HelloWorld2 implements Runnable { public void run() { System.out.println("안녕하세요, 2"); } }
public class RuntimeLoading { public static void main(String[] args) { try { if (args.length < 1) { System.out.println("사용법: java RuntimeLoading [클래스이름]"); System.exit(1); } Class klass = Class.forName(args[0]); Object obj = klass.newInstance(); Runnable r = (Runnable) obj; r.run(); } catch(Exception ex) { ex.printStackTrace(); } } }
코드 2.
런타임동적로딩은클래스를로딩할때가아닌코드를실행하는순간에클래스를로딩하는것을말합니다.
코드 2에서 Class.forName(className)은파리미터로받은 className에해당하는클래스를로딩한후에그클래스에해당하는로딩한클래스의인스턴스가아닌 Class 인스턴스를리턴합니다. 그리고 Class 클래스의 newInstance() 메소드는 Class가나타내는클래스의인스턴스를생성합니다. 예를들어, 코드 3은 java.lang.String 클래스의객체를생성합니다.
Class klass = Class.forName("java.lang.String"); Object obj = klass.newInstance();
코드 3.
따라서, Class.forName() 메소드를실행하는클래스에서는 Class.forName()이실행되기전까지는어떤클래스를참조하는지알수없습니다.
ClassLoader
클래스로더를사용하기위해서는보통의자바클래스처럼해당하는클래스의객체를생성하고, 그객체의특정메소드를호출하면됩니다. 또한, 상속을받아클래스로드를커스터마이징할수도있습니다.
자바의클래스로더는클래스로더딜리게이션모델(ClassLoader Delegation Model)으로서부모클래스로더가먼저클래스를로딩하도록합니다. 즉, 특정클래스로더클래스를읽어온클래스로더(부모클래스로더)에게클래스로딩을요청하는것입니다.
그림 1. ClassLoader Delegation Model[1]
그림 1은클래스로더간의관계를보여주고있습니다. 이경우, NetworkClassLoader(가정)는 JarFileClassLoader(가정)가로딩하고, JarFileClassLoader 클래스는 AppClassLoader가로딩하였음을보여줍니다. 즉, JarFileClassLoader는 NetworkClassLoader의부모클래스로더가되고, AppClassLoader는 JarFileClassLoader의부모클래스로더가되는것입니다.