|
|
FRAMEWORK/SPRING 2014. 4. 18. 16:24
표준프레임워크 dataaccess artifact version을 다음과 같이 2.7.0으로 변경한다. <!-- 실행환경 라이브러리 -->
<dependency>
<groupId>egovframework.rte</groupId>
<artifactId>egovframework.rte.psl.dataaccess</artifactId>
<version>2.7.0</version>
</dependency> Spring XML 설정 파일 상(ex: context-mapper.xml)에 다음과 같은 sqlSession bean 추가한다. Ex) context-mapper.xml <!-- SqlSession setup for MyBatis Database Layer -->
<bean id="sqlSession" class="org.mybatis.spring.SqlSessionFactoryBean">
<property name="dataSource" ref="dataSource" />
<property name="mapperLocations" value="classpath:/sqlmap/mappers/**/*.xml" />
</bean> MyBatis 가이드에 따라 query xml 작성한다. (2.1의 예제 상 지정된 mapperLocations 위치) DAO의 경우는 다음과 같이 3가지 방식이 가능하다. | 방식 | 설명 | 비고 |
|---|
| 기존 DAO 클래스 방식 | @Repository 지정 및 EgovAbstractMapper extends 활용 | 기존 iBatis와 같은 방식 | | Mapper interface 방식 | Mapper 인터페이스 작성 및 @Mapper annotation 지정 | @Mapper는 marker annotation(표준프레임워크 제공) | | Annotation 방식 | query xml 없이 mapper 인터페이스 상 @Select, @Insert 등을 활용 | Dynamic SQL 등의 사용에 제약이 있음 |
@Repository 지정된 class가 EgovAbstractMapper를 extends 하여 insert, update, delete, selectByPk, list 메소드를 활용한다. @Repository("deptMapper")
public class DeptMapper extends EgovAbstractMapper {
public void insertDept(String queryId, DeptVO vo) {
insert(queryId, vo);
}
public int updateDept(String queryId, DeptVO vo) {
return update(queryId, vo);
}
public int deleteDept(String queryId, DeptVO vo) {
return delete(queryId, vo);
}
public DeptVO selectDept(String queryId, DeptVO vo) {
return (DeptVO)selectByPk(queryId, vo);
}
@SuppressWarnings("unchecked")
public List<DeptVO> selectDeptList(String queryId, DeptVO searchVO) {
return list(queryId, searchVO);
}
}Mapper 인터페이스 작성 시 다음과 같이 @Mapper annotation 사용한다. (패키지를 포함하는 클래스명 부분이 mapper xml 상의 namespace가 선택되고 인터페이스 메소드가 query id로 호출되는 방식) @Mapper("employerMapper")
public interface EmployerMapper {
public List<EmpVO> selectEmployerList(EmpVO vo);
public EmpVO selectEmployer(BigDecimal empNo);
public void insertEmployer(EmpVO vo);
public int updateEmployer(EmpVO vo);
public int deleteEmployer(BigDecimal empNo);
}이 경우는 xml 설정 상에 다음과 같은 MapperConfigurer 설정이 필요하다. Ex: context-mapper.xml <bean class="egovframework.rte.psl.dataaccess.mapper.MapperConfigurer">
<property name="basePackage" value="egovframework.rte.**.mapper" />
</bean> basePackage에 지정된 패키지 안에서 @Mapper annotation을 스캔하는 설정이다. ⇒ @Mapper로 지정된 인터페이스를 @Service에서 injection 하여 사용함 public class EmployerMapperTest {
@Resource(name = "employerMapper")
EmployerMapper employerMapper;
@Test
public void testInsert() throws Exception {
EmpVO vo = makeVO();
// insert
employerMapper.insertEmployer(vo);
// select
EmpVO resultVO = employerMapper.selectEmployer(vo.getEmpNo());
// check
checkResult(vo, resultVO);
}mapper xml 작성 없이 Mapper 인터페이스 상에 @Select, @Insert, @Update, @Delete 등의 annotation을 통해 query가 지정되어 사용된다. @Mapper("departmentMapper")
public interface DepartmentMapper {
@Select("select DEPT_NO as deptNo, DEPT_NAME as deptName, LOC as loc from DEPT where DEPT_NO = #{deptNo}")
public DeptVO selectDepartment(BigDecimal deptNo);
@Insert("insert into DEPT(DEPT_NO, DEPT_NAME, LOC) values (#{deptNo}, #{deptName}, #{loc})")
public void insertDepartment(DeptVO vo);
@Update("update DEPT set DEPT_NAME = #{deptName}, LOC = #{loc} WHERE DEPT_NO = #{deptNo}")
public int updateDepartment(DeptVO vo);
@Delete("delete from DEPT WHERE DEPT_NO = #{deptNo}")
public int deleteDepartment(BigDecimal deptNo);
}⇒ 이 경우는 별도의 mapper xml을 만들 필요는 없지만, dynamic query를 사용하지 못하는 등의 제약사항이 따름
출처 -http://www.egovframe.go.kr/wiki/doku.php?id=egovframework:rte2:psl:dataaccess:mybatisguide
FRAMEWORK/SPRING 2013. 12. 17. 17:41
http://openframework.or.kr/framework_reference/spring/ver2.x/html/index.html
 reference_spring_2.x.zip reference_spring_2.x.zip
FRAMEWORK/SPRING 2013. 12. 15. 02:59
스프링을 사용하다보면 부득이하게 “spring bean“을 일반 자바 또는 “static 메서드“로
선언된 곳에서 spring bean을 호출을 해야 하는 경우가 있습니다. 예를 들어서 “Servlet Filter“에서 “특정 spring bean”사용 한다 거나 특히, “유틸리티” 기능을
하는 클래스들(“주로 static으로 메서드가 선언된 클래스“)에서 사용할 경우가 대표적인
예라고 할 수 있습니다. 위와 같은 경우 어떻게 사용하는지에 대해서 “recipe“를 알려 드리겠습니다. (1) 스프링 빈 설정 먼저 호출되어질 “스프링 빈“을 간단하게 설정하도록 하겠습니다. SampleBean.java 1 2 3 4 5 6 7 8 9 10 11 12 13 14 15 16 17 18 19 20 21 22 23 24 25 |
public String echo () throws Exception {
return "My Bean!!!";
}
}
|
위의 클래스를 스프링 빈으로 설정 합니다.
bean.xml 1 2 3 4 5 6 7 8 9 10 11 12 13 | <?xml version="1.0" encoding="UTF-8"?>
<bean id="sampleBean" class="com.ucore2.migration.simulator.SampleBean"/>
</beans>
|
(2) web.xml 설정 아래와 같이 “web.xml”에 스프링 컨텐스트를 설정 합니다.
여기서 중요한 부분은 “RequestContextListener” 리스너 입니다.
해당 리스너의 역할은 “현재 요청되어진 “HttpServletRequest” 객체의 레퍼런스
정보를 저장하는 기능을 갖고 있습니다.
즉 , current request에 대한 정보를 노출시켜주는 기능 입니다. 1 2 3 4 5 6 7 8 9 10 11 12 13 | <context-param>
<param-name>contextConfigLocation</param-name>
<param-value>classpath*:/bean.xml</param-value>
</context-param>
<listener>
<listener-class>
org.springframework.web.context.ContextLoaderListener
</listener-class>
</listener>
<listener>
<listener-class>org.springframework.web.context.request.RequestContextListener</listener-class>
</listener>
|
(2) utility 클래스 작성 “스프링 빈”를 호출해서사용하는 “utility 클래스” 입니다.
“RequestContextHolder” 클래스를 사용해서, 현재 요청한 “HttpServletRequest”
객체를 가져 옵니다.
나머지 코드는 기본적으로 스프링 빈을 가져오는 코드들 입니다. 1 2 3 4 5 6 7 8 9 10 11 12 13 14 15 16 17 18 19 20 21 22 23 24 25 26 27 28 29 30 31 32 33 34 35 36 37 38 39 40 41 42 43 44 45 46 47 48 49 50 51 52 53 54 55 | </pre>
public static String getMessage () throws Exception {
HttpServletRequest request = ((ServletRequestAttributes) RequestContextHolder.getRequestAttributes()).getRequest();
HttpSession session = request.getSession();
ServletContext conext = session.getServletContext();
WebApplicationContext wContext = WebApplicationContextUtils.getWebApplicationContext(conext);
SampleBean sBean = (SampleBean)wContext.getBean("sampleBean");
return sBean.echo();
}
}
|
(2) controller 적용하기 컨트롤러에서 위의 “utility 클래스“를 호출 합니다. 1 2 3 4 5 6 7 8 9 10 11 12 13 14 15 16 17 18 19 20 21 22 23 24 25 26 27 28 29 30 31 32 33 34 35 36 37 38 |
@RequestMapping(method = RequestMethod.GET)
public void handleGET() throws Exception {
logger.info("message : " + StaticUtil.getMessage());
}
}
|
컨트롤러를 실행하면 아래와 같이 결과가 출력 됩니다.
 Conclusion
해당 방법은 “HpptServletRequest” 객체를 참조하기 어려운 클래스에서 호출시에
좋은 “tip“이 될것 입니다. 참고로 “Web Application“에서만 해당 된다는 점을
유념 하시기 바랍니다.
출처 - http://beyondj2ee.wordpress.com/2012/12/06/static-%EB%A9%94%EC%84%9C%EB%93%9C-%EB%98%90%EB%8A%94-%EC%9E%90%EB%B0%94-%EC%97%90%EC%84%9C-spring-%EB%B9%88-%EA%B0%80%EC%A0%B8%EC%98%A4%EA%B8%B0/
FRAMEWORK 2013. 11. 6. 17:30
JNDI(Java Naming Directory Interface) 데이타베이스 다루는 방법| 소개 | JNDI 데이타베이스 환경설정은 JNDI-자원-사용법에 (JNDI-Resources-HOWTO) 광범위하게 퍼져있다. 그러나, 톰캣-사용자로 부터 피드백(feedback)중에서, 특히 개인적인 환경설정에 대해 매우 까다롭게 될 수 있다는 것을 보여줬다. 여기 환경설정에 대한 몇가지 예시가 있다. 톰캣 유저들을 위한 대중적인 데이타베이스(databases)와 디비(db)사용법에 대한 몇가지 일반적인 작은 조언들(tips)이 게시되었었다. 환경설정으로부터 얻어낸 주의사항들과(혹은 이나)톰캣-사용자에게 게시된 YMMV(Your Mileage May Vary) -'귀하의 마일리지는 변할 수 있다는 뜻'를 사용자들이 잘 인식해야 한다. 만약 당신이 그밖에 다른 검증된 환경설정을 한다면, 당신은 넓은 분위기에서 사용하는 것을 느낄수도 있고, 아니면 혹시 당신이 우리가 이 부분을 어떤 방법으로든 (환경설정과 관련하여)개선할 수 있다고 느낀다면 우리에게 알려달라. JNDI 자원 환경설정은 톰캣 5.0.x과 톰캣 5.5.x간에 약간 변했다는 것에 주의하라. 당신은 주로 더 오래된 자원 환경설정을 변경하고, 톰캣 7.x.x에서의 과업을 그들이(환경설정) 제대로 만드는 것을 위해 아래의 예시가 필요할 것이다. 또한, 일반으로 JNDI 데이터소스 설정과, 그리고 특히 이 튜토리얼에서는 여러분이 이후 레퍼런스에 나오는 자동 애플리케이션 배치에 관한 섹션을 포함해서, Context와 Host를 읽어서 이해하고 있다고 가정한다는 것을 알아주기 바란다.
|
| 드라이버 매니저, 서비스공급자 구조와 메모리 낭비 | java.sql.DriverManager는 서비스 공급자구조를 지원하는 것이다. 모든 이용가능한 JDBC 드라이버들의 특징은 메타-INF/서비스/자바의 SQL 드라이버(META-INF/services/java.sql.Driver) 파일들을 자동적으로 발견하며 JDBC 드라이버 자신들을 제공하며 나타내는 것이고, 로드(load)하고, 등록하고, 당신이 JDBC접속하기 전, 데이타베이스 드라이버를 불르기 위해 필요한 사람들의 부담을 확실하게 당신으로부터 덜어준다. 하지만, 이러한 것의 실행은 서블릿(servlet)컨테이너 환경에 대한 모든 자바 버전들이 기본적으로 순조롭지 않다. java.sql.DriverManager에서의 문제점은 오직 한번 드라이버들을 자세히 살피는 것이다.
JRE 메모리 낭비 예방 리스너는 아파치 톰캣이 시작하는 동안 드라이버를 자세히 살피기 시작하면서 해결하는 것이 함께 포함된다. 이것은 기본적으로 가능하게 된다. 그것이 의미하는 것은 오직 라이브러리들을 리스너에서 보는 것이다. 예를 들면 각각의$CATALINA_BASE/lib는 데이타베이스 드라이버들에 대해 자세히 살펴보게 될것이다. 만약 이것의 특징을 당신이 바꿀것을 고려 중이라면, 사용중인 JDBC가 첫번째 웹 프로그램에 의해 사용하게 되는지 보면서 주의 하고, 웹 프로그램이 재실행되고, 다른 웹 프로그램에 대하여 JDBC에 의존하는 것이 실패가 따르는 것도 주의하라. 따라서, 웹 프로그램은 그들의 WEB-INF/lib파일목록에서 서비스공급자 구조에 의존할 수 없고, 드라이버들을 분명하게 등록해야 할 수 있는 내부에서의 데이타베이스 드라이버들을 가지고 있다. java.sql.DriverManager는 또한 메모리 낭비의 일부라고 알려져 있다. 웹 프로그램에 의해 등록된 어떤 드라이버들은 웹 프로그램이 (작동을)멈추면 반드시 등록을 취소하게 된다. 톰캣은 자동적으로 발견하고 웹 프로그램 클래스 로더에 의해 불려진 어떠한 JDBC 드라이버들의 등록 취소는 웹 프로그램이 멈추었을 때, 시도할 것이다. 그러나, 프로그램들이 프로그램 자신을 위해ServletContextListener를 통해서 하는 것을 기대하게된다.
|
| 데이타베이스 연결 풀(DBCP) 환경설정 | 아파치 톰캣에서의 기본 데이타베이스 연결 풀 구현은 Apache Commons 프로젝트에서 가져온 라이브러리들에 의존한다. 다음의 라이브러리들이 사용된다: 이 라이브러리들은 $CATALINA_HOME/lib/tomcat-dbcp.jar의 단 하나의 jar 안에 위치해있다. 그러나 오직 클래스들은 연결 풀링이 포함되는 것을 필요로 하고, 그리고 그런 패키지들은 프로그램들과 간섭하는 것을 피하기 위해 개명하게 되었다. DBCP 1.4는 JDBC 4.0을 지원한다. | Preventing database connection pool leaks | 데이타베이스 연결 풀은 데이타베이스에 여러개의 공통된 접속을 만들고 관리한다. 이미 존재하고 있는 데이타베이스의 접속상태를 다시쓰고 재활용 하는 것이 (데이타베이스를)새롭게 여는것보다 더욱 효율적이다. 여기 공통으로 접속하는 것과 함께 하나의 문제점이 있다. 웹 프로그램은 명확하게 설정한 결과(ResultSet)와 문장(Statement) 그리고 접속(Connection)을 기록하고 종료처리해야 한다. 웹 프로그램의 실수를 차단 하기 위하여 이런 자원들이 절대 웹 프로그램에 재사용을 위해 다시 이용가능하게 끝낼 수 없다(데이타베이스 접속 공통 "낭비"). 만약 더 이상 이용가능한 접속이 없다면, 이것이 결국에는 당신의 웹 프로그램 데이타베이스 접속이 실패로 끝날 수 있다. 이 문제에 대해 하나의 해결책이 있다. 아파치 Commons DBCP는 이런 폐기된 데이타베이스 접속을 회복하고 추적하기 위해 환경설정을 할 수 있게 되었다. 단순히 데이타베이스연결을 회복할 뿐만 아니라, 거기에 개방된 자원들과 결코 차단되지 않은 데이타베이스 연결 코드에 대한 임시기억의 흔적을 찾아낸다. 폐기된 데이타베이스 연결들은 삭제되고, 당신의 DBCP 데이타소스를 위한 Resource 환경설정을 더하며 데이터 처리를 되풀이하며, 뒤따르는 자원에게 돌려주는 것은 DBCP 데이타자원을 설정하기 위해서이다. 낮은 실행의 DBCP를 이용가능한 데이타베이스의 연결이 회복하고, 어떤 폐기된 데이타베이스를 연결에서 그것을 찾고, 같은 데이타를 반복하여 처리한다. 기본값은 false이다. removeAbandonedTimeout을 설정하고 되돌려서 사용하기 위한 일정시간의 데이터베이스 연결은 그것이 고려되어 폐기되기 이전에 작동이 멈추었다.
 | | | | removeAbandonedTimeout="60" | | | | |
제거하여 폐기된 접속을 위한 기본 남은시간은 300초이다. 그런 logAbandoned 속성은 순서에 맞고, true 설정되어 질 수 있다. 만약 당신이 DBCP에 파기된 데이타베이스 접속 자원 코드의 일시적인 흔적을 기록하고 싶다면 말이다. 기본값은 false이다.
|
| MySQL DBCP 예시 | 0. 소개MySQL의 버전(판)과 JDBC드라이버는 작업하기 위해 보고되었다. - MySQL 3.23.47, MySQL 3.23.47 이노디비를 사용하고 있다(using InnoDB,). MySQL 3.23.58, MySQL 4.0.1알파
- Connector/J 3.0.11-안정적인 (공식적인 JDBC 드라이버)
- mm.mysql 2.0.14 (JDBC 드라이버의 오래된 3번째 그룹)
여러분은 이것을 진행하기 전에, $CATALINA_HOME/lib안에 JDBC Driver's jar를 복사하는 걸 잊지 말라. 1. MySQL 환경설정이것을 따라하면서 변경한다면 문제가 발생할 수 있다는 것을 명심하라. 새로운 시험 사용자를 새로운 데이타베이스와 단 하나의 시험 테이블과 함께 생성하라. 당신의 MySQL 사용자는 반드시 지정된 하나의 암호를 가지고 있어야 한다. 당신이 암호가 없이 접속을 시도하려 한다면 드라이버에 접속실패 할 것이다. | | | | mysql> GRANT ALL PRIVILEGES ON *.* TO javauser@localhost
-> IDENTIFIED BY 'javadude' WITH GRANT OPTION;
mysql> create database javatest;
mysql> use javatest;
mysql> create table testdata (
-> id int not null auto_increment primary key,
-> foo varchar(25),
-> bar int);
| | | | |
주의: 테스팅을 마치면 위 사용자는 제거되어야 한다! 다음으로 testdata 테이블에 테스트 데이터를 넣는다. | | | | mysql> insert into testdata values(null, 'hello', 12345);
Query OK, 1 row affected (0.00 sec)
mysql> select * from testdata;
+----+-------+-------+
| ID | FOO | BAR |
+----+-------+-------+
| 1 | hello | 12345 |
+----+-------+-------+
1 row in set (0.00 sec)
mysql>
| | | | |
2. Context configuration2.Context 환경설정톰캣에서 JNDI 데이타소스는 여러분의 Context에서 당신의 자원을 위해 추가함으로써 나타내며 환경설정한다. 예를 들면: | | | | <Context>
<!-- maxActive: 데이타베이스 연결 풀의 최대값
여러분은 확실하게 당신의 mysqld의 엄청난 접속을 충분히 많은 것을,
당신의 디비 접속에서의 모든것을 다루기 위해 환경설정하라.
제한없기 위해 -1값에서 정하라.(0보다 작고,-값에선 무한대기)
-->
<!-- maxIdle: 특별한 일 없이 유지하는 데이타베이스 접속풀의 최대 갯수
제한없기위해 -1에서 지정하라. 이것을 또한 DBCP 문서에서 보고,
minEvictableIdleTimeMillis(사용되지 않는 커넥션을 추출할때 지정한 시간
이상 비활성화 상태인 것만 추출하는 최소한의 시간)의 환경설정 매개변수와
minEvictableIdleTimeMillis도 그렇게 하라.
-->
<!-- maxWait: ms에서 이용가능케 되기 위한 어떤 데이타베이스 접속을
위해 기다리는 최대의 시간, 예를들어 10초 이다. 어떤 예외는 이것이 남는 시간이
초과되면 동작된다.
지정된 시간없이 기다리게 하기 위해서 -1값으로 지정하라.
-->
<!-- 사용자이름과 비밀번호: 데이터베이스 접속을 위한 MySQL 사용자이름과 비밀번호 -->
<!-- driverClassName: 오래된 mm.mysql JDBC driver를 위한 클래스 이름은
org.gjt.mm.mysql.Driver -이다. 우린 Connector/J를 통해 사용하는 것을 추천한다.
공식적인 MySQL Connector/J 드라이버에 대한 클래스 이름은 com.mysql.jdbc.Driver이다.
-->
<!-- url: MySQL 데이타베이스 접속을 위한 JDBC 접속경로. -->
<Resource name="jdbc/TestDB" auth="Container" type="javax.sql.DataSource"
maxActive="100" maxIdle="30" maxWait="10000"
username="javauser" password="javadude" driverClassName="com.mysql.jdbc.Driver"
url="jdbc:mysql://localhost:3306/javatest"/>
</Context>
| | | | |
3. web.xml의 환경설정테스트 프로그램을 위해 WEB-INF/web.xml을 지금 만들어보자. | | | | <web-app xmlns="http://java.sun.com/xml/ns/j2ee"
xmlns:xsi="http://www.w3.org/2001/XMLSchema-instance"
xsi:schemaLocation="http://java.sun.com/xml/ns/j2ee
http://java.sun.com/xml/ns/j2ee/web-app_2_4.xsd"
version="2.4">
<description>MySQL Test App</description>
<resource-ref>
<description>DB Connection</description>
<res-ref-name>jdbc/TestDB</res-ref-name>
<res-type>javax.sql.DataSource</res-type>
<res-auth>Container</res-auth>
</resource-ref>
</web-app>
| | | | |
4. 테스트 코드이제 나중에 사용하기 위해 간단한test.jsp를 지금 만들어보자. | | | | <%@ taglib uri="http://java.sun.com/jsp/jstl/sql" prefix="sql" %>
<%@ taglib uri="http://java.sun.com/jsp/jstl/core" prefix="c" %>
<sql:query var="rs" dataSource="jdbc/TestDB">
select id, foo, bar from testdata
</sql:query>
<html>
<head>
<title>DB Test</title>
</head>
<body>
<h2>Results</h2>
<c:forEach var="row" items="${rs.rows}">
Foo ${row.foo}<br/>
Bar ${row.bar}<br/>
</c:forEach>
</body>
</html>
| | | | |
이 JSP페이지는 JSTL's SQL과 핵심 태그라이브러리에 사용된다. You can get it from 여러분은 아파치 톰캣 태그라이브러리 - 표준 태그 라이브러리 프로젝트 —로부터 얻을 수 있고, 당신은 확실히 1.1.x release를 얻을 수 있다. 당신이 JSTL을 얻으면, jstl.jar과 standard.jar를 당신의 web app's WEB-INF/lib의 디렉토리에 복사하라. 마지막으로 여러분의 웹 앱안에 $CATALINA_BASE/webapps 워파일(warfile)이라 불리는 DBTest.war이나 DBTest라고 불리는 하위 디렉토리안에 파일들을 배치하라. 배치하고 하면, http://localhost:8080/DBTest/test.jsp에서 브라우저를 당신의 결과물을 보기위해 지정하라.
|
|
| DBCP 이외의 해결책들 | 이런 해결책들은 하나의 단순한 연결로 데이터베이스에 사용하거나(시범 이외의 다른 어떤 것도 추천하지 않는다!) 몇몇 다른 풀링(Pooling)기술이다.
|
| 오라클 8i과 OCI 고객 | | 소개 | 윌스트(Whilst)는 모호하게 OCI 클라이언트가 사용하는 JNDI 데이터소스의 탄생을 언급하지 않고, 이런 점들을 오라클과 DBCP 해결책 위에 조합하게 되었다. OCI 드라이버의 사용을 위해서, 사용자는 설치된 오라클 클라이언트를 가지고 있어야 한다. 그리고 사용자는 cd에서 오라클8i(8.1.7) 클라이언트를 설치했어야 하고, 적용가능한 JDBC/OCI driver(Oracle8i 8.1.7.1 JDBC/OCI Driver)를otn.oracle.com 에서 다운 받아야 한다. 그 다음에, classes12.zip파일을 classes12.jar으로 톰캣에서 정정하고, $CATALINA_HOME/lib에 복사하여 넣어야 한다. 사용자는 톰캣과 JDK의 버전에 이런 파일로부터 종속하고 있는 javax.sql.*클래스들을 또한 제거해야 할수도 있다.
|
| 모든 것을 다같이 대입할때 | 당신이 ocijdbc8.dll나 .so를 당신의 $PATH나 LD_LIBRARY_PATH에 (가능하다면 $ORAHOME\bin안에)확실히 가지고 있으면, 원래 라이브러리에 사용하고 있는 System.loadLibrary("ocijdbc8");에 단순한 테스트 프로그램에 의해 적재되어질 수 있다. 사용자는 간단한 테스트용 서블릿을 만들거나 jsp에 만들어야 한다. You should next create a simple test servlet or jsp that has these 크리스탈 라인: | | | | DriverManager.registerDriver(new
oracle.jdbc.driver.OracleDriver());
conn =
DriverManager.getConnection("jdbc:oracle:oci8:@database","username","password");
| | | | |
데이타베이스의 형식(host:port:SID)이고, 만약에 지금 사용자가 사용자의 시험용 servlet/jsp의 URL에 접근하는 것을 시도한다면, 사용자가 java.lang.UnsatisfiedLinkError:get_env_handle의 근원과 함께 ServletException을 획득한다. 첫째로, UnsatisfiedLinkError는 사용자가 다음의 상황에 처해있다는 것을 알려준다. - 사용자의 JDBC 파일과 사용자의 오라클 클라이언트 버전(client version)이 일치하지 않는다는 것이다. 그것은 라이브러리 파일을 찾을 수 없게되었다는 메세지에서 명시한다. 예를 들어, 사용자는 오라클 버전 8.1.5와 함께 오라클 버전 8.1.6버전부터 클래스12 파일(classes12.zip file)을 사용하고 있을지도 모른다. 이런 클래스xxx파일(classeXXXs.zip file)과 오라클 클라이언트 소프트웨어 버전은 반드시 일치해야 한다.
- A
$PATH, LD_LIBRARY_PATH의 문제. - 이것으로서 당신이 otn과
$ORAHOME\jdbc\lib에서 작동할 그 디렉토리로부터 사용하고 있는 클래스12 압축파일에 대해 설명되었다.
다음으로 사용자는 ORA-06401 NETCMN: invalid driver designator에러에 대하여 경험할 수도 있다. 오라클 문서는 "원인: 로그인(연결)문자는 유효하지 않은 드라이버 설계자를 포함한다. 지침행동: 문자와 다시제출하고 연결하라." 이렇게 제시할 것이다. 데이타베이스 연결 문자를(host:port:SID의 양식에서) 다음과 같이 바꾸어라.(description=(address=(host=myhost)(protocol=tcp)(port=1521))(connect_data=(sid=orcl))) Ed.흠, 나는 만약에 사용자가 사용자의 TNSNames를 정리하는 것이 정말로 필요하지 않는다고 봐요. 오라클 데이터베이스 관리자가 아니니까요:-)
|
|
| 공통적인 문제들 | 여기에 몇가지 공통적인 문제들이 웹 어플리케이션과 함께 데이터베이스를 사용할 때와 그것들을 어떻게 해결하는가에 있다. | 간간이 발생하는 데이터베이스 연결 실패 | 톰캣은 자바버츄얼머신(JVM)안에서 운영한다. 이 JVM은 주기적으로 가비지 콜렉션(GC)에서 더이상 사용되어 지지 않는 자바 객체들을 지우기 위하여 운영한다. JVM을 톰캣 프리즈(freezes)안에서 코드의 실행을 위해 운영할 때, 만약 데이터베이스 연결의 설정을 위해 최대 환경설정 시간은 GC의 시간의 총량보다 적다면 사용자는 데이터베이스 연결 획득 실패할 수 있다. 장기간에 걸친 불필요한 정보정리(garbage collection)에서 자료를 모으기 위한것은 톰캣을 시작할 때, -verbose:gc 독립변수를 당신의 CATALINA_OPTS환경에 추가로 가져가고 있는 것이다. 어지러운 gc(garbage collection)는 당신의$CATALINA_BASE/logs/catalina.out 로그 파일이 장기간에 걸친 gc를 가져가는 것에 포함하면서 모든 불필요한 정보정리를 위해 자료를 포함할 것이다. 사용자의 JVM의 해당 시간에 99% 가깝게 조정된 GC는 1초보다 적게 걸린다. 나머지는 오직 몇초만이 걸릴 것이다. 드물게도, 언제든지 GC가 10초 보다 더욱 GC를 가져가야 한다. 디비 접속 시간초과는 10~15초로 되어 있는것을 확실히 해라. 이런 DBCP(DataBase Connection Pool)를 위하여 사용자는 maxWait의 사용중인 인자값을 정하라.
|
| 무작위의 접숙과 닫혀진 예외들 | 이런 것들은 어떤 요청있어서 디비접속의 이런 접속 풀(Pool)과 2것을 다시 닫을 때로부터 발생할 수 있다. 이런 접속 풀을 사용할 때, 접속했던 접속을 닫고 다른 요청으로 재사용을 하기 위해, 해당 풀로 다시 돌아오라. 그렇게 한다면 접속이 닫히지 않는다. 그리고 톰캣은 다중 쓰레드로 동시발생 요청을 다루기 위해 사용한다. 여기에서 톰캣 내부의 에러의 원인에 대한 이벤트 발생의 예문이 제시되있다. 하나의 요청, 1번째 쓰레드 안의 1개의 실행중인 디비 접속.
하나의 요청이 디비 접속을 닫는다.
JVM(자바 버츄얼 머신)이 실행중인 1번째 쓰레드를 2번째 쓰레드로 전환한다.
2번째 쓰레드 안에서 실행중인 2번째 요청이 디비 접속을 한다.
(이 동일한 디비 접속은 1번째 요청에 의해 종료했다.).
JVM은 운영중인 쓰레드(2번째 쓰레드)를 1번째 쓰레드에게 되돌려준다.
1번째 쓰레드는 마지막 블록안에서 2번 디비 접속을 종료한다.
JVM 2번째 쓰레드에게 운영중인 쓰레드(1번째 쓰레드)를 전환한다.
2번째 요청의 2번째 쓰레드는 디비 접속을 사용하려 시도하지만, 1번째 요청으로 닫혀있어서 실패한다.
커넥션 풀에서 데이터베이스를 사용하기 위한 적절하게 쓰여진 코드의 예제가 여기 있다. Connection conn = null;
Statement stmt = null; // Or PreparedStatement if needed
ResultSet rs = null;
try {
conn = ... get connection from connection pool ...
stmt = conn.createStatement("select ...");
rs = stmt.executeQuery();
... iterate through the result set ...
rs.close();
rs = null;
stmt.close();
stmt = null;
conn.close(); // Return to connection pool
conn = null; // Make sure we don't close it twice
} catch (SQLException e) {
... deal with errors ...
} finally {
// Always make sure result sets and statements are closed,
// and the connection is returned to the pool
if (rs != null) {
try { rs.close(); } catch (SQLException e) { ; }
rs = null;
}
if (stmt != null) {
try { stmt.close(); } catch (SQLException e) { ; }
stmt = null;
}
if (conn != null) {
try { conn.close(); } catch (SQLException e) { ; }
conn = null;
}
}
|
| JNDI 자원의 정의와 범위의 상호작용 | 작업 공간을 얻기 위하여, 이 공간은 반드시 정의된 <GlobalNamingResources>나 or <Context> 부분에서 데이타소스를 참조하여야 하며 사용하고 있는 재정의된 <ResourceLink>는 안된다.
|
|
출처 - http://kenu.github.io/tomcat70/docs/jndi-datasource-examples-howto.html
FRAMEWORK/SPRING 2013. 10. 17. 13:24
얼마전 “CBT Live” 테스트(실제 서비스 장비에서 성능/기능 통합 테스트)를 하면서
발생한 문제를 공유하고자 합니다. (1) 증상 외부 시스템에 “A“라는 사용자 정보를 요청 했는데, 확인을 해보니 “B” 사용자
정보가 등록이 되었습니다. “Local” 개발 환경에서는 전혀 그런 증상이 없었고, 실제로 서비스를 하려는
“CBT” 개발 환경에서 “성능/기능 테스트“를 하면서 해당 이슈가 발생을 하였습니다. 그래서 “log“를 확인했습니다.
그런데 이상한 점이 “요청을 위임하는 모듈“에서는 정확히 “A” 사용자 정보
가 있었고, “실제 서버와 통신하는 모듈“에서 “B” 사용자 정보를 호출 했습니다.
확인 결과 “Spring Bean“에 대한 개발자의 이해 부족으로 발생된 에러 였습니다.
해결 방법을 말씀 드리기전에 “Spring Application Context“에 대해서
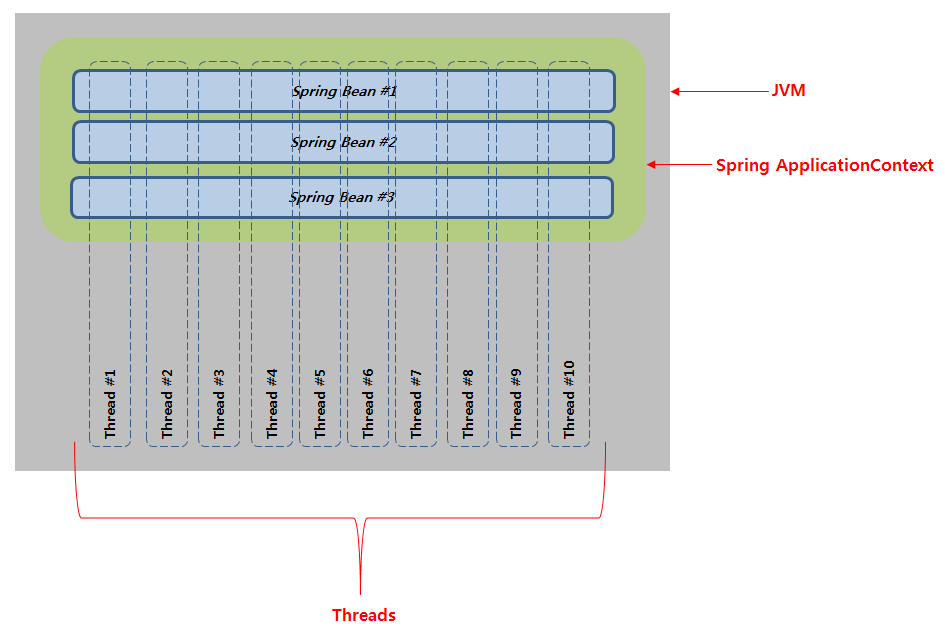
간략하게 설명을 드리겠습니다. (2) Spring Big Picture 아래의 그림은 “멀티 쓰레드 환경에서 스프링 빈” 관계를 직접 그려봤습니다. 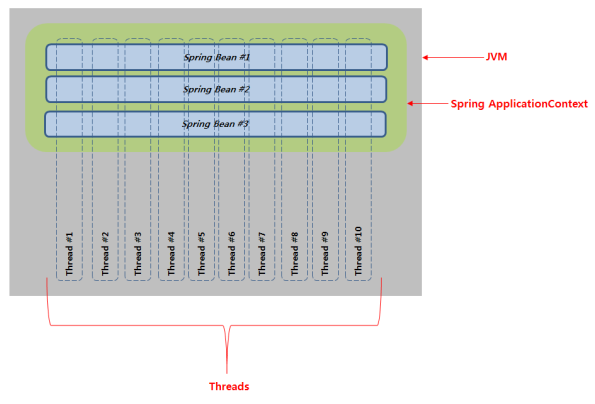
“SpringFramework” 기반으로 만든 “어플리케이션”은 기동시 “ApplicationContext“라는
“Static Sharing Pool“를 생성 합니다.
좀더 쉽게 설명을 하면 하나의 “싱글톤” 패턴 방식의 구현된 오브젝트가 생성 됩니다.
(정확히는 “싱글톤 패턴”은 아닙니다. 이해를 돕기 위해서) 이렇게 생성된 “ApplicationContext” 영역에 “POJO(Plain Old Java Object) 클래스“
들의 오브젝트들이 등록이 됩니다. “POJO” 클래스는 그냥 “new 하면 스스로 생성”이 가능한 클래스의 형태를 말합니다. 이렇게 등록된 오브젝트를 “Spring Bean“이라고 합니다.
비록 “POJO” 클래스에 “static“으로 선언을 하지 않더라도, “ApplicationContext“
가 이미 “Sharing“이 되어 있기때문에 “당연히 등록된 Bean”로
“멀티 Thread 환경“에서 서로 공유를 하게 됩니다.
(물론 prototype일 경우는 매번 생성을 합니다.) 위에 그림을 보면 “JVM”에서 하나의 공유 “ApplicationContext”가 생성이 되며
“Spring Bean #1″, “Spring Bean #2″, “Spring Bean #3″ 등
3개의 “Bean”이 등록이 되어 있고, “1번부터 10번 Thread 모두
동일한 Bean 오브젝트“를 사용을 합니다. 여기까지는 “SpringFramework“를 개발하신 분들은 알고 계실 겁니다. 문제는 개발자들이 Spring Bean의 멤버변수 또한 멀티쓰레드 환경에서
공유가 된다는 것을 간과한다는 것입니다.
이러한 실수는 “Thread Safe” 한 프레임웍(Servlet, Netty Handler, Camel Router, Spring Controller)들에 대한 오해 때문입니다.
문서를 보면 당연히 “Thread Safe“하다고 명시된 부분만을 확인하지, 실제 어디까지
“Thread Safe“하지 않는지 확인을 잘 안한다는 것입니다. 대부분 public 메서드”안에서 선언된 로컬 변수가 “Thread Safe”한거지 “멤버변수”
까지 “Thread Safe” 하다라는 것입니다. 즉 정확한 확인이 필요 합니다. (3) 해결 방법 및 코딩 가이드
아래는 개발자가 문제를 일으켰단 소스 입니다. 1 2 3 4 5 6 7 8 9 10 11 12 13 14 15 16 | @Service
public class MemberController{
@Autowired
private UserRepository userRepository;
private Member member = new Member();
public void createUser(String id, String name) throws Exception {
member.setID(id);
member.setName(name);
userRepository.insertUser(member);
}
}
|
7 Line : 멤버변수 “Member” 오브젝트를 생성 합니다.
11 Line : 파라미터 id를 member 오브젝트의 id 속성에 값 설정을 합니다
12 Line : 파라미터 name를 member 오브젝트의 name 속성에 값 설정을 합니다 소스를 보면 위에서 언급한것 처럼 “멤버변수“를 “Bean” 최초 생성시 초기화를 합니다.
그 다음 부터는 “createUser” 메서드에서 계속 재사용을 합니다.
당연히 “createUser” 메서드는 “Thread Safe” 합니다. 하지만 문제는 “멤버변수” 입니다. 해당 코드를 아래와 같이 “리팩토링” 해야 합니다. 1 2 3 4 5 6 7 8 9 10 11 12 13 14 | @Service
public class MemberController{
@Autowired
private UserRepository userRepository;
public void createUser(String id, String name) throws Exception {
Member member = new Member();
member.setID(id);
member.setName(name);
userRepository.insertUser(member);
}
}
|
8 Line : 멤버변수 부분을 삭제하고, 대신 “createUser” 메서드에서 생성을 합니다.
코드는 상당히 간단 합니다. 간혹 물어 보시는 분들이 “저렇게 매번 생성하면” 메모리에
부담이 있는것 아니냐 하시는 분들이 있습니다. “createUser” 메서드가 종료되면 자연스럽게 “member” 오브젝트는 “GC“
대상이 됩니다. (4) Conclusion “멀티 쓰레드 환경에서 스프링빈 주의사항“에 대해서 말씀 드렸습니다.
사실 별거 아닐수 있지만 상당히 주의를 요하며, 개발시에 팀원들에게 숙지를
해야 하며, 팀장 또는 선임 개발자들은 “코드 Inspection“시 반드시
이 부분에 대한 점검이 필요 합니다. 왠만하면 “스프링”에서 “멤버변수”는 “Injection“에 사용하는 “bean“일 경우만
사용하도록 권고 드립니다. 제가 왜 이렇게 강조를 하는 이유는 디버깅이 하기가 너무 어렵다는 이유 입니다. 대부분 개발시에는
개발자 환경은 멀티 쓰레드 환경이 아닙니다. 그렇기 때문에
발견이 거의 되지를 않습니다. 대부분 개발 후반에 성능 테스트
할때 발견이 됩니다. 특정 서버가 CPU를 많이 차지 하거나, 메모리 사용률을 많이 점유하면
thread dump를 떠서 확인을 하지만 이렇게 thread간 race condition
깨진 경우는 dump떠서 확인이 힘들고, 특히나 여러 클래스에 그렇게
사용을 하면 더 찾기가 어렵습니다. 최악의 경우는 프로젝트 막바지는 “멘붕” 상태이기 때문에 “선무당”이 사람 잡는다고
전체 서버에 JDK를 다른 버전을 설치 하거나, WAS를 다시 설치 하거나, 심지어
OS 커널 또는 버전을 바꿔야 한다든지 더 큰 상황으로 치닫을수 있습니다. 또한 수십, 수백명이 이런 코드를 양산될 경우는 더더욱 트러블 슈팅이 어렵습니다.
이점 유념하시고 개발 하셨으면 합니다.
출처 - http://beyondj2ee.wordpress.com/2013/02/28/%EB%A9%80%ED%8B%B0-%EC%93%B0%EB%A0%88%EB%93%9C-%ED%99%98%EA%B2%BD%EC%97%90%EC%84%9C-%EC%8A%A4%ED%94%84%EB%A7%81%EB%B9%88-%EC%A3%BC%EC%9D%98%EC%82%AC%ED%95%AD/
FRAMEWORK/SPRING 2013. 8. 23. 16:21
Spring-2.5.6 에서 여러개의 DataSource를 사용하는 방법을 소개한다.
다음과 같이 두개의 데이터 소스가 선언되어 있을 때 자동 주입(Inject)하고자 한다면
<context:component-scan base-package="com.kyobobook.kflow" />
<!-- ===================================================================== -->
<!-- Transaction Configuration -->
<!-- ===================================================================== -->
<aop:config proxy-target-class="true" />
<bean id="riUniTestDataSource" class="org.apache.commons.dbcp.BasicDataSource" destroy-method="close">
<qualifier value="riUniTestDataSource" />
<property name="driverClassName" value="com.sybase.jdbc3.jdbc.SybDriver" />
<property name="url" value="jdbc:sybase:Tds:192.168.0.15:3000" />
<property name="connectionProperties" value="charset=eucksc;" />
<property name="username" value="dev_kf" />
<property name="password" value="dev_kf" />
</bean>
<bean id="riDataSource" class="org.apache.commons.dbcp.BasicDataSource" destroy-method="close">
<qualifier value="riDataSource" />
<property name="driverClassName" value="com.sybase.jdbc3.jdbc.SybDriver" />
<property name="url" value="jdbc:sybase:Tds:192.168.0.6:3000/biltis" />
<property name="connectionProperties" value="charset=eucksc;" />
<property name="username" value="dev_kb" />
<property name="password" value="dev_kb" />
</bean>
첫번째 @Resource annotation을 사용할 수 있다.
@Resource(name = "riDataSource")
public void setDataSource(DataSource dataSource) {
super.buildSqlMapClient(dataSource);
}
두번째 방법은 @Autowired와 @Qualifier 를 사용하는 방법이다.
@Autowired
public void setDataSource(@Qualifier("riDataSource") DataSource dataSource) {
super.buildSqlMapClient(dataSource);
}
위 두가지 방법의 차이점은 DI(Dependency Injection)를 어떻게 할 것인가이다. 다음은 Anyframe에서 설명하는 Dependency Injection 에 대한 내용이다.(설명이 잘되어 있어서 퍼왔으나 라이센스가 문제가 된다면 링크로 변경할 것입니다.)
특정 Bean의 기능 수행을 위해 다른 Bean을 참조해야 하는 경우 사용하는 Annotation으로는 @Autowired 또는 @Resource가 있다.
- @Autowired
Spring Framework에서 지원하는 Dependency 정의 용도의 Annotation으로, Spring Framework에 종속적이긴 하지만 정밀한 Dependency Injection이 필요한 경우에 유용하다.
- @Resource
JSR-250 표준 Annotation으로 Spring Framework 2.5.* 부터 지원 가능한 Annotation이다. Annotation 사용으로 인해 특정 Framework에 종속적인 어플리케이션을 구성하지 않기 위해서는 @Resource를 사용할 것을 권장한다. @Resource를 사용하기 위해서는 클래스패스 내에 jsr250-api.jar 파일이 추가되어야 함에 유의해야 한다.
다음은 @Resource를 사용한 예이다.
@Service
public UserServiceImpl implements UserService {
    @Resource
    private UserDAO userDAO;
}
@Autowired와 @Resource를 사용할 수 있는 위치는 다음과 같이 약간의 차이가 있으므로 필요에 따라 적절히 사용하면 된다.
- @Autowired : 필드, 생성자, 입력파라미터가 여러개인 메소드(@Qualifier는 메소드의 파라미터)에 적용 가능
- @Resource : 필드, 입력 파라미터가 한 개인 빈 프로퍼티 setter 메소드에 적용가능
@Autowired나 @Resource를 필드에 직접 정의하는 경우 별도 setter 메소드는 정의하지 않아도 된다.
Type-driven Injection@Autowired는 기본적으로 type-driven injection 이다. 타입으로 참조할 빈을 찾았을 때 같은 타입의 빈이 여러 개 검색되었을 경우, @Qualifier annotation을 사용하여 구분할 수 있도록 해준다.
다음은 @Qualifier를 사용한 예이다.
@Service
public ProductService {
    @Autowired
    @Qualifier("electronics")
    private ProductCategory productCategory;
}
- XML을 사용한 정의
<bean class="anyframe.sample.springmvc.annotation.web. SimpleProductCategory">
<qualifier value="electronics"/>
<!-- inject any dependencies required by this bean -->
</bean>
<bean class="anyframe.sample.springmvc.annotation.web.SimpleProductCategory">
<qualifier value="cosmetics"/>
<!-- inject any dependencies required by this bean -->
</bean>
- Annotation을 사용한 정의
@Component
@Qualifier("electronics")
public class ElectronicsProductCategory implements ProductCategory {
	//...
}
기본적으로 @Autowired가 적용된 프로퍼티는 필수이기 때문에 반드시 해당 빈이 존재해야 하지만, required 속성을 false로 설정하는 경우에는 해당되는 Bean을 찾지 못하더라도 에러가 발생하지 않는다.
@Service
public UserService implements UserService {
    @Autowired(required=false)
    private UserDAO userDAO;
}
Naming Auto Wired Dependencies@Resource annotation은 다음과 같은 경우에 사용한다.
- Bean name으로 Dependency Injection을 하고자 하는 경우
- Type-driven injection을 할 수 없는 Collection이나 Map 타입의 빈
@Resource를 사용하는 경우 참조되는 Bean은 변수명을 Bean Name으로 하여 Spring 컨테이너에 의해 자동으로 인지되는데, 변수명을 이용하여 참조 관계에 놓인 Bean을 찾았는데 해당 Bean이 없는 경우에는 클래스 타입을 이용하게 된다. 참조 관계에 놓인 Bean의 Name을 직접 명시하고자 하는 경우에는 다음과 같이 'name' 속성을 부여할 수 있다.
@Service
public UserServiceImpl implements UserService {
    @Resource (name="uDAO")
    private UserDAO userDAO;
}
FRAMEWORK/SPRING 2013. 8. 20. 18:05
The life cycle of a Spring bean is easy to understand. When a bean is instantiated, it may be required to perform some initialization to get it into a usable state. Similarly, when the bean is no longer required and is removed from the container, some cleanup may be required. Though, there is lists of the activities that take place behind the scenes between the time of bean Instantiation and its destruction, but this chapter will discuss only two important bean lifecycle callback methods which are required at the time of bean initialization and its destruction. To define setup and teardown for a bean, we simply declare the <bean> with init-method and/ordestroy-method parameters. The init-method attribute specifies a method that is to be called on the bean immediately upon instantiation. Similarly, destroy-method specifies a method that is called just before a bean is removed from the container. Initialization callbacks:The org.springframework.beans.factory.InitializingBean interface specifies a single method: void afterPropertiesSet() throws Exception; So you can simply implement above interface and initialization work can be done inside afterPropertiesSet() method as follows: public class ExampleBean implements InitializingBean {
public void afterPropertiesSet() {
// do some initialization work
}
}In the case of XML-based configuration metadata, you can use the init-method attribute to specify the name of the method that has a void no-argument signature. For example: <bean id="exampleBean"
class="examples.ExampleBean" init-method="init"/>Following is the class definition: public class ExampleBean {
public void init() {
// do some initialization work
}
}Destruction callbacksThe org.springframework.beans.factory.DisposableBean interface specifies a single method: void destroy() throws Exception; So you can simply implement above interface and finalization work can be done inside destroy() method as follows: public class ExampleBean implements DisposableBean {
public void destroy() {
// do some destruction work
}
}In the case of XML-based configuration metadata, you can use the destroy-method attribute to specify the name of the method that has a void no-argument signature. For example: <bean id="exampleBean"
class="examples.ExampleBean" destroy-method="destroy"/>Following is the class definition: public class ExampleBean {
public void destroy() {
// do some destruction work
}
}If you are using Spring's IoC container in a non-web application environment; for example, in a rich client desktop environment; you register a shutdown hook with the JVM. Doing so ensures a graceful shutdown and calls the relevant destroy methods on your singleton beans so that all resources are released. It is recommended that you do not use the InitializingBean or DisposableBean callbacks, because XML configuration gives much flexibility in terms of naming your method. Example:Let us have working Eclipse IDE in place and follow the following steps to create a Spring application: | Step | Description |
|---|
| 1 | Create a project with a name SpringExample and create a package com.tutorialspoint under the src folder in the created project. | | 2 | Add required Spring libraries using Add External JARs option as explained in the Spring Hello World Example chapter. | | 3 | Create Java classes HelloWorld and MainApp under the com.tutorialspoint package. | | 4 | Create Beans configuration file Beans.xml under the src folder. | | 5 | The final step is to create the content of all the Java files and Bean Configuration file and run the application as explained below. |
Here is the content of HelloWorld.java file: package com.tutorialspoint;
public class HelloWorld {
private String message;
public void setMessage(String message){
this.message = message;
}
public void getMessage(){
System.out.println("Your Message : " + message);
}
public void init(){
System.out.println("Bean is going through init.");
}
public void destroy(){
System.out.println("Bean will destroy now.");
}
}Following is the content of the MainApp.java file. Here you need to register a shutdown hookregisterShutdownHook() method that is declared on the AbstractApplicationContext class. This will ensures a graceful shutdown and calls the relevant destroy methods. package com.tutorialspoint;
import org.springframework.context.support.AbstractApplicationContext;
import org.springframework.context.support.ClassPathXmlApplicationContext;
public class MainApp {
public static void main(String[] args) {
AbstractApplicationContext context =
new ClassPathXmlApplicationContext("Beans.xml");
HelloWorld obj = (HelloWorld) context.getBean("helloWorld");
obj.getMessage();
context.registerShutdownHook();
}
}Following is the configuration file Beans.xml required for init and destroy methods: <?xml version="1.0" encoding="UTF-8"?>
<beans xmlns="http://www.springframework.org/schema/beans"
xmlns:xsi="http://www.w3.org/2001/XMLSchema-instance"
xsi:schemaLocation="http://www.springframework.org/schema/beans
http://www.springframework.org/schema/beans/spring-beans-3.0.xsd">
<bean id="helloWorld"
class="com.tutorialspoint.HelloWorld"
init-method="init" destroy-method="destroy">
<property name="message" value="Hello World!"/>
</bean>
</beans>Once you are done with creating source and bean configuration files, let us run the application. If everything is fine with your application, this will print the following message: Bean is going through init.
Your Message : Hello World!
Bean will destroy now.
Default initialization and destroy methods:If you have too many beans having initialization and or destroy methods with the same name, you don't need to declare init-method and destroy-method on each individual bean. Instead framework provides the flexibility to configure such situation using default-init-method and default-destroy-methodattributes on the <beans> element as follows: <beans xmlns="http://www.springframework.org/schema/beans"
xmlns:xsi="http://www.w3.org/2001/XMLSchema-instance"
xsi:schemaLocation="http://www.springframework.org/schema/beans
http://www.springframework.org/schema/beans/spring-beans-3.0.xsd"
default-init-method="init"
default-destroy-method="destroy">
<bean id="..." class="...">
<!-- collaborators and configuration for this bean go here -->
</bean>
</beans>
출처 - http://www.tutorialspoint.com/spring/spring_bean_life_cycle.htm
FRAMEWORK 2013. 8. 5. 12:52
insert() 성공: null / 실패: 에러 발생 update() 성공: 적용된 row 수 / 실패: 0 delete() 삭제한 row수 return
* insert태그의 경우 결과가 object 로 넘어오기 때문에 java에서 int형으로 결과를 받을 경우 null을 return 하게 된다. 따라서 insert시에도 update태그를 쓰는편이 사용하기도 편하고 원하는 결과를 얻기도 쉬우니 update태그에 insert쿼리를 쓰기도 한다.
FRAMEWORK/SPRING 2013. 7. 31. 15:18
Expert Spring MVC and Web Flow (Expert)에 소개된 springmodules의 valang을 활용하면 Validator를 자바 코딩 없이 선언만으로 구현할 수 있다.(XML 설정만으로 가능하다)
복잡한 자체적인 문법을 갖고 있어서 테스트 필요성이 높다. Expert Spring MVC and Web Flow (Expert)의 p281에는 테스트 예제가 있다.
public class PersonValidatorTests extends TestCase {
public void testEmptyPersonValidation() {
Person person = new Person();
Validator validator = new PersonValidator();
BindException errors = new BindException(person, "target");
validator.validate(person, errors);
new ErrorsVerifier(errors) {
{
forProperty("firstName").hasErrorCode("person.firstName.required")
.forProperty("lastName").hasErrorCode("person.lastName.required")
.otherwise().noErrors();
}
}
}
}
ErrorsVerifier를 헬퍼(Helper class)로 사용하여 간결하게 작성했지만 문제가 있다. ErrorsVerifier 클래스는 spring은 물론 spring-modules에도 존재하지 않는다는 점이다. 구글을 통해 Spring 포럼에 올라온 글, 'Where is ErrorsVerifier class mentioned in Expert Spring MVC?'을 확인할 수 있었다.
하지만, spring-modules의 테스트 및 소스 코드를 조금 참조하면 어렵지 않게 테스트를 작성하 수 있다.
public class MemberValidationTest extends TestCase { private Member member;
private ValangValidator validator;
BindException errors; @Override
protected void setUp() throws Exception { member = new Member();
errors = new BindException(member, "member");
validator = new ValangValidator(); } public void testPasswordValidation() throws Exception{ validator.setValang(
"{ password : ? is not blank : '' : 'member.password.empty' }"
);
validator.afterPropertiesSet(); // configure validation rules validator.validate(member, errors);
assertEquals("member.password.empty", errors.getFieldError("password ").getCode()); } }
spring-modules의 테스트는 spring의 컨텍스트 파일(xml 형식의) 설정을 통해 테스트를 한다. 그러나, 단위 테스트를 목적으로 한다면 외부 리소스에 의존하는 일은 가능한 제거하는 것이 좋다고 생각하여 위와 같이 직접 setValang()을 호출한 것이다. setValang()은 실제로는 다음과 같은 식으로 설정해야 한다.
<bean id="easyAddressValidator" class="org.springmodules.validation.ValangValidator ">
<property name="valang">
<value><![CDATA[{ password : ? is not blank : '' : 'member.password.empty' }]]></value>
</property>
</bean>
spring-module의 의존성에 따라 테스트를 실행하려면, 다음 라이브러리가 필요하다.
assertion을 위한 코드가 늘어서는 것도 가독성을 크게 저해하지는 않는다. 책에서의 의도와 비슷하게 Fluent Interface 스타일을 적용해서 조금 수정해봤다.
public void testPasswordValidation() throws Exception{ validator.setValang(
"{ password : ? is not blank : '' : 'member.password.empty' }"
);
validator.afterPropertiesSet(); // configure validation rules validator.validate(member, errors); new ErrorsVerifier(errors)
.forProperty("password").hasErrorCode("member.password.empty"); } class ErrorsVerifier{ private Errors errors;
private String cursor; // one of successive properties
public ErrorsVerifier(BindException errors) {
this.errors = errors;
}
public ErrorsVerifier forProperty(String property) { cursor = property;
return this; } public ErrorsVerifier hasErrorCode(String errorCode) { assertEquals(errorCode, errors.getFieldError(cursor).getCode());
return this;
}
}
아쉬운 것은 정작 감춰야 할 부분인 아래 구문이 그대로 노출된다는 점이다:
validator.afterPropertiesSet();
감추기 추가적으로, valang 사용시 주의할 사항 0순위는 조건문이라고 생각된다. 마치 오른쪽과 왼쪽이 헷갈리는 것처럼 valang으로 기입한 조건이 만족하지 않으면 BindError가 발생한다는 사실을 유념해야 한다. 간단한 valang 설정 샘플을 첨부한다. validator.setValang(
"{ id : length(?) >= 3 : '' : 'member.id.tooshort' }" +
"{ password : length(?) >= 4 : '' : 'member.password.tooshort' }" +
"{ name : length(?) >= 2 : '' : 'member.name.tooshort' }" +
"{ alias : ? is blank and length(?) >= 2 : '' : 'member.alias.tooshort' }"
);
또한, valang의 기본적으로 제공하는 함수 중에 앞의 예에서 보는 length()와 함께 email()이 있는데 주의할 점은 is true와 함께 써야 의도한대로 작동한다는 점이다. "{ email : email(?) is true : '' : 'member.email.invaldformat' }" // 좋은 표현
"{ email : email(?) : '' : 'member.email.invaldformat' }" // parser exception 발생
감추기
감추기 원하는 함수가 없는 경우 직접 만들어서 사용할 수 있다. valang에 의존적인 클래스를 상속해야 하고 테스트가 무척 어렵기 때문에 가능하면 쓰지 않는 것이 좋을듯하나 편리하다. 이하 사용자 함수 작성 public class UrlFunction extends AbstractFunction { public UrlFunction(Function[] arguments, int line, int column) {
super(arguments, line, column);
} /*
* (non-Javadoc)
*
* @see org.springmodules.validation.valang.functions.AbstractFunction#doGetResult(java.lang.Object)
*/
@Override
protected Object doGetResult(Object target) throws Exception { String url = getArguments()[0].getResult(target).toString(); if (url != null) {
try {
new URL(url);
return true;
} catch (MalformedURLException e) {
return false;
}
} return false;
} } 등록 validator.setValang(
"{ blog : url(?) is true : '' : 'member.blog.invaldformat' }"
);
validator.addCustomFunction("url", "net.webapp2.util.valang.UrlFunction"); 감추기
출처 - http://ahnyounghoe.tistory.com/99
FRAMEWORK/SPRING 2013. 7. 31. 15:09
Spring Modules Validation
The Spring Modules project has a number of subprojects, including validation. This module is based on Spring ModulesValidation Version 0.9 and has a number of enhancements to the Valang part of the project. Thanks to everyone that has worked on this project previously and currently. Valang is short for Va-lidation Lang-uage. It provides a very readable language for expressing validation rules, as well as providing the ability to add custom functions to the language. Once the ValangValidator is configured, using it isn't different than any other Spring Validator since it implements org.springframework.validation.Validator. Below is a list of current enhancements. Version 0.91 - Bytecode generation added to DefaultVisitor as a replacement for reflection accessing simple properties (BeanPropertyFunction) for a significant performance improvement.
- Basic enum comparison support. In the expression below the personType is an enum and the value
STUDENT will be convereted to an enum for comparison. The value must match an enum value on the type being compared or an exception will be thrown.personType EQUALS ['STUDENT']
For better performance the full class name can be specified so the enum can be retrieved during parsing. The first example is for standard enum and the second one is for an inner enum class .personType EQUALS ['org.springmodules.validation.example.PersonType.STUDENT']
personType EQUALS ['org.springmodules.validation.example.Person$PersonType.STUDENT']
- Where clause support. In the expression below, the part of the expression
price < 100 will only be evaluated if thepersonType is 'STUDENT'. Otherwise the validation will be skipped.price < 100 WHERE personType EQUALS ['STUDENT']
![[Note]](http://www.springbyexample.org/examples/images/note.gif) | Note |
|---|
Support for the where clause has not been added to the JavaScript custom tag currently. |
- Improved performance of 'IN'/'NOT IN' if comparing a value to a java.util.Set it will use Set.contains(value). Static lists of Strings (ex: 'A', 'B', 'C') are now stored in a Set instead of an ArrayList.
- Functions can be configured in Spring, but need to have their scope set as prototype and use a FunctionWrapper that is also a prototype bean with <aop:scoped-proxy> set on it.
- Removed servlet dependency from Valang project except for the custom JSP tag ValangValidateTag needing it, but running Valang no longer requires it. This involved removing ServletContextAware from it's custom dependency injection. If someone was using this in a custom function, the function can now be configured directly in Spring and Spring can inject any "aware" values.
- Changed logging to use SLF4J api.
Version 0.92 - Removed custom dependency injection since functions can be configured in Spring.
- Added auto-discovery of FunctionWrapper beans from the Spring context to go with existing auto-discovery of FunctionDefinition beans.
Version 0.93 - Made specific comparison classes for each operator for a performance improvement.
- Changed IS WORD and IS BLANK to use Commons Lang StringUtils, which will change the behavior slightly but should be more accurate to the description of the validation.
- Change Operator from interfaces to an enum and removed OperatorConstants.
- Fixed bytecode generation to handle a
Map, a List, and an Array.
Version 0.94 - Upgraded to Spring 3.0 and changed group & artifact IDs to match standard Spring naming conventions.
Version 0.95 - Upgraded to Spring 3.1 and minor improvements to bytecode generation.
The basic construction of a Valang rule is to have it begin and end with a brace. Within the braces, the default property name for the rule is specified first. Then the Valang expression, followed by the default error message. These are all the required values for a Valang rule. The other optional values for a rule are the error message key and arguments for it. Each of the values of the rule are delimitted by a colon. { <property-name> : <expression> : <default-error-message> : <error-message-key> : <error-message-args> } Table 1. Rule Syntax | Rule Value | Description | Required |
|---|
| property-name | This is the default property of the bean being targeted for validation, and can be referred to with the shortcut ? in an expression. | true | | expression | The Valang expression. | true | | default-error-message | The default error message. If this isn't needed, it can be left blank even though it's required. | true | | error-message-key | The message resource key for the i18n error message. | false | | error-message-arg | If the error-message-key is specified, arguments for the error message can also be set as the final value of the rule. This accepts a comma delimited list of values. | false |
The expression language provides an English like syntax for expressing validation rules. There are a number of operators for comparing a value to another. Logical expressions, resulting in true or false, can be grouped together with parentheses to form more complex expressions. Just to give some context to the explanation of all the rules, below is a simple example. The bean being validated has the properties getFirstName(), getLastName(), and getAge(). The first two return a String and the last returns an int. The default property is 'firstName', which is referred to by the question mark. The first part of the rule enclosed in parentheses checks if the first name is either 'Joe' or it's length is greater than 5. The next part checks if the last name is one of the values in the list, and the final part checks if the age is over 18. (? EQUALS 'Joe' OR length(?) > 5) AND lastName IN 'Johnson', 'Jones', 'Smith' AND age > 18
The parser is not case sensitive when processing the operators. Table 2. Expression Operators | Comparison Operator | Description | Supports | Example |
|---|
| = | == | IS | EQUALS | Checks for equality. | Strings, booleans, numbers, dates, and enums. | firstName EQUALS 'Joe' | | != | <> | >< | IS NOT | NOT EQUALS | Checks for inequality. | Strings, booleans, numbers, dates, and enums. | firstName NOT EQUALS 'Joe' | | > | GREATER THAN | IS GREATER THAN | Checks if a value is greater than another. | Numbers and dates. | age > 18 | | < | LESS THAN | IS LESS THAN | Checks if a value is less than another. | Numbers and dates. | age > 18 | | >= | => | GREATER THAN OR EQUALS | IS GREATER THAN OR EQUALS | Checks if a value is greater than or equal to another. | Numbers and dates. | age >= 18 | | <= | =< | LESS THAN OR EQUALS | IS LESS THAN OR EQUALS | Checks if a value is less than or equal to another. | Numbers and dates. | age <= 18 | | NULL | IS NULL | Checks if a value is null. | Objects. | firstName IS NULL | | NOT NULL | IS NOT NULL | Checks if a value is not null. | Objects. | firstName IS NOT NULL | | HAS TEXT | Checks if the value has at least one non-whitespace character. | Strings. | firstName HAS TEXT | | HAS NO TEXT | Checks if the value doesn't have a non-whitespace character. | Strings. | firstName HAS NO TEXT | | HAS LENGTH | Checks if the value's length is greater than zero. | Strings. | firstName HAS LENGTH | | HAS NO LENGTH | Checks if the value's length is zero. | Strings. | firstName HAS NO LENGTH | | IS BLANK | Checks if the value is blank (null or zero length). | Strings. | firstName IS BLANK | | IS NOT BLANK | Checks if the value isn't blank (not null, length greater than zero). | Strings. | firstName IS NOT BLANK | | IS UPPERCASE | IS UPPER CASE | IS UPPER | Checks if the value is uppercase. | Strings. | firstName IS UPPERCASE | | IS NOT UPPERCASE | IS NOT UPPER CASE | IS NOT UPPER | Checks if the value isn't uppercase. | Strings. | firstName IS NOT UPPERCASE | | IS LOWERCASE | IS LOWER CASE | IS LOWER | Checks if the value is lowercase. | Strings. | firstName IS LOWERCASE | | IS NOT LOWERCASE | IS NOT LOWER CASE | IS NOT LOWER | Checks if the value isn't lowercase. | Strings. | firstName IS NOT LOWERCASE | | IS WORD | Checks if the value has one or more letters or numbers (no spaces or special characters). | Strings. | firstName IS WORD | | IS NOT WORD | Checks if the value doesn't have one or more letters or numbers (no spaces or special characters). | Strings. | firstName IS NOT WORD | | BETWEEN | Checks if a value is between two other values. | Numbers and dates. | age BETWEEN 18 AND 65 | | NOT BETWEEN | Checks if a value isn't between two other values. | Numbers and dates. | age NOT BETWEEN 18 AND 65 | | IN | Checks if a value is in a list. | Strings, booleans, numbers, dates, and enums. | firstName IN 'Joe', 'Jack', 'Jane', 'Jill' | | NOT IN | Checks if a value isn't in a list. | Strings, booleans, numbers, dates, and enums. | firstName NOT IN 'Joe', 'Jack', 'Jane', 'Jill' | | NOT | Checks for the opposite of the following expression. | Any expression. | NOT firstName EQUALS 'Joe' | | ! | Changes a boolean expression to it's opposite. | Booleans | matches('\\s+', firstName) IS !(TRUE) | | AND | Used to join together the logical comparisons on either side of the operator. Both must evaluate totrue. | Any expression. | firstName EQUALS 'Joe' AND age > 21 | | OR | Used to join together the logical comparisons on either side of the operator. Only one must evaluate totrue. | Any expression. | firstName EQUALS 'Joe' OR age > 21 | | WHERE | If the where expression is true, then the main expression for validation is performed. Otherwise it isn't evaluated and no errors are generated. | Any expression. | firstName EQUALS 'Joe' WHERE age > 21 | | this | A reference to the bean passed in for validation, which could be passed into a custom function for example. | Any expression. | isValid(this) IS TRUE |
Table 3. Literals | Literal Type | Description | Example |
|---|
| String | String literals are surrounded by single quotes. | 'Joe' | | Numbers | Numbers can be expressed without any special syntax. Numbers are all parsed usingBigDecimal. | 1, 100, 0.73, -2.48 | | Dates | Date literals are surrounded by brackets. These are the supported formats supported by the DefaultDateParser. yyyyMMdd, yyyy-MM-dd, yyyy-MM-dd HH:mm:ss, yyyyMMdd HHmmss, yyyyMMdd HH:mm:ss,yyyy-MM-dd HHmmss | [20081230], [2008-12-30], [2008-12-30 12:20:31] | | Booleans | There are four different constants for boolean values. The values 'TRUE' and 'YES' represent true, and the values 'FALSE' and 'NO' represent false | TRUE, YES, FALSE, NO | | Enums | Enums are surrounded by bracket and single quotes. If the full path to the enum isn't specified, it will be resolved when the expression is evaluated by looking up the enum value from enum on the opposite side of the expression. | ['FAIL'], ['org.springmodules.validation.valang.CreditStatus.FAIL'], ['org.springmodules.validation.valang.Person$CreditRating.EXCELLENT'] |
Mathematical Operator SyntaxValang supports basic mathematical formulas based on numeric literals and property values. Table 4. Mathematical Expression Operators | Mathematical Operator | Description | Example |
|---|
| + | Addition operator. | price + 12 | | - | Subtraction operator. | price - 12 | | * | Multiplication operator. | price * 1.2 | | / | DIV | Division operator. | price / 2 | | % | MOD | Modulo operator. | age % 10 |
Valang supports standard property and nested property access to the bean passed in for validation. Table 5. Property Syntax | Property Type | Description | Example |
|---|
| Standard | Using standard JavaBean property notation, a value from the bean being validated may be retrieved. The address represents getAddress() on the bean. | address IS NOT NULL | | Nested | Using standard JavaBean property notation, a nested value from the bean being validated may be retrieved. The address.city represents getAddress().getCity() on the bean. | address.city IS NOT BLANK | | List | From an array, List, or Set, a value from it can be returned by specifying it's index. Only arrays and lists are supported by bytecode generation. | addresses[1] IS NOT NULL | | Map | From a Map, the value based on the key specified is retrieved. | addresses[home] IS NOT NULL |
These are built in functions that come with Valang. The function framework is pluggable, so it's easy to add custom functions. Adding custom functions will be covered in the next section. Table 6. Functions | Function | Description | Example |
|---|
| length | len | size | count | Returns the size of a collection or an array, and otherwise returns the length of string by called toString() on the object. | length(firstName) < 20 | | match | matches | Performs a match on a regular expression. The first argument is the regular expression and the second is the value match on. | matches('\\w+', firstName) IS TRUE | | email | Checks if the value is a valid e-mail address. | email(email) IS TRUE | | upper | Converts the value to uppercase. | upper(firstName) EQUALS 'JOE' | | lower | Converts the value to lowercase. | lower(firstName) EQUALS 'joe' | | resolve | Wraps a string in DefaultMessageSourceResolvable. | resolve('personForm.firstName') EQUALS 'First Name' | | inRole | Checks if the user authenticated by Spring Security is in a role. | inRole('ADMIN') IS TRUE |
Custom functions can either be explicitly registered or instances of FunctionDefinition and FunctionWrapper are automatically registered with a ValangValidator. If just specifying a class name, it must have a constructor with the signature Function[] arguments, int line, int column. The FunctionWrapper is specifically for Spring configured functions. If the Function in a FunctionWrappertakes any arguments, it must implement ConfigurableFunction which allows the parser to configure the arguments, line number, and column number. Otherwise the line & column number will not be set on a Spring configured function. | Note |
|---|
It's important for a FunctionWrapper around a custom Function to be of the scope prototype as well as theFunctionWrapper. Also the FunctionWrapper must have <aop:scoped-proxy/> defined so each call to it will get a new instance of the function. This is because as the validation language is parsed a new instance of a function is made each time and has the arguments specific to that function set on it. |
The example below shows how to explicitly register a custom function directly with a validator. The custom functions 'validLastName' and 'creditApproval' are registered on the customFunctions property as a Map. The key is the name of the function to be used in the validation language and the value if the function being registered, which can either be the fully qualified name of the class or an instance of FunctionWrapper. Instances of FunctionDefinition and FunctionWrapper are automatically registered with a ValangValidator The custom functions 'validLastName' and 'creditApproval' are registered. If a FunctionWrapper doesn't have a function name specified, the name of the bean will be used for the function name. Checks if the last name is in a list, and if it isn't false is returned. Example 1. ValidLastNameFunction
public class ValidLastNameFunction extends AbstractFunction {

    final Logger logger = LoggerFactory.getLogger(ValidLastNameFunction.class);

    final Set<String> lValidLastNames = new HashSet<String>();

    /**
     * Constructor
     */
    public ValidLastNameFunction(Function[] arguments, int line, int column) {
        super(arguments, line, column);
        definedExactNumberOfArguments(1);

        lValidLastNames.add("Anderson");
        lValidLastNames.add("Jackson");
        lValidLastNames.add("Johnson");
        lValidLastNames.add("Jones");
        lValidLastNames.add("Smith");
    }

    /**
     * Checks if the last name is blocked.
     *
     * @return      Object      Returns a <code>boolean</code> for
     *                          whether or not the last name is blocked.
     */
    @Override
    protected Object doGetResult(Object target) {
        boolean result = true;

        String symbol = getArguments()[0].getResult(target).toString();

        if (!lValidLastNames.contains(symbol)) {
            result = false;
        }

        return result;
    }

}
The function checks if a person can get credit approval. Their credit rating is checked against a list only if they are over 18 years old. Example 2. ConfigurableFunction
public class CreditApprovalFunction extends AbstractFunction
        implements ConfigurableFunction {

    final Logger logger = LoggerFactory.getLogger(CreditApprovalFunction.class);

    Set<Person.CreditRating> lCreditRatings = new HashSet<Person.CreditRating>();

    /**
     * Constructor
     */
    public CreditApprovalFunction() {}

    /**
     * Constructor
     */
    public CreditApprovalFunction(Function[] arguments, int line, int column) {
        super(arguments, line, column);
        definedExactNumberOfArguments(2);

        lCreditRatings.add(Person.CreditRating.FAIR);
        lCreditRatings.add(Person.CreditRating.GOOD);
        lCreditRatings.add(Person.CreditRating.EXCELLENT);
    }

    /**
     * Gets number of expected arguments.
     * Implementation of <code>ConfigurableFunction</code>.
     */
    public int getExpectedNumberOfArguments() {
        return 2;
    }

    /**
     * Sets arguments, line number, and column number.
     * Implementation of <code>ConfigurableFunction</code>.
     */
    public void setArguments(int expectedNumberOfArguments, Function[] arguments,
                             int line, int column) {
        // important to set template first or can cause a NullPointerException
        // if number of arguments don't match the expected number since
        // the template is used to create the exception
        super.setTemplate(line, column);
        super.setArguments(arguments);
        super.definedExactNumberOfArguments(expectedNumberOfArguments);
    }

    /**
     * Sets valid credit rating approval list.
     */
    public void setCreditRatingList(Set<Person.CreditRating> lCreditRatings) {
        this.lCreditRatings = lCreditRatings;
    }

    /**
     * If age is over 18, check if the person has good credit,
     * and otherwise reject.
     *
     * @return      Object      Returns a <code>boolean</code> for
     *                          whether or not the person has good enough
     *                          credit to get approval.
     */
    @Override
    protected Object doGetResult(Object target) {
        boolean result = true;

        int age = (Integer) getArguments()[0].getResult(target);
        Person.CreditRating creditRating = (Person.CreditRating)getArguments()[1].getResult(target);

        // must be over 18 to get credit approval
        if (age > 18) {
            if (!lCreditRatings.contains(creditRating)) {
                result = false;
            }
        }

        return result;
    }

}
If the validator will only be used to validate a specific class, the property 'className' can be specified to avoid reflection. If it's set, a custom Function will be generated that directly retrieves a property to avoid reflection. This provides a significant performance improvement if that is a concern, which typically isn't if the validation is being used to validate a web page since the delay is so small either way. | Note |
|---|
Only a Map, a List, or an Array is supported by bytecode generation, not a Set. Primitive arrays currently aren't supported, but any object one is. Also, nested properties are currently not supported. |
This is a small excerpt from the logging of the performance unit test. As you can see from the logging, as the validator is initialized it generates bytecode and shows for which class and method, as well as what the generated class name is. The package and name of the original class is used and then has what property is being retrieved appended along with 'BeanPropertyFunction$$Valang' to make a unique class name to try to avoid any collisions. Results from ValangValidatorPerformanceTest which was run on a Macbook Pro (2.3GHz Intel Core i7 with 8 GB RAM with OS X 10.6.8) with Java 6. All the expressions are identical, but adjusted to either retrieve the values being compared from a JavaBean, Map, List, or an array. Table 7. Bytecode Generation Performance Comparison | Expression | Reflection | Bytcode Generation |
|---|
| { lastName : validLastName(?) is true AND creditApproval(age, creditRating) is true WHERE firstName IN 'Joe', 'Jack', 'Jill', 'Jane' AND creditStatus IN ['org.springmodules.validation.valang.CreditStatus.PENDING'], ['org.springmodules.validation.valang.CreditStatus.FAIL'] AND creditRating EQUALS ['org.springmodules.validation.valang.Person$CreditRating.EXCELLENT'] AND age > 18 : '' } | 1176ns | 327ns | | { mapVars[lastName] : validLastName(?) is true AND creditApproval(mapVars[age], mapVars[creditRating]) is true WHERE mapVars[firstName] IN 'Joe', 'Jack', 'Jill', 'Jane' AND mapVars[creditStatus] IN ['org.springmodules.validation.valang.CreditStatus.PENDING'], ['org.springmodules.validation.valang.CreditStatus.FAIL'] AND mapVars[creditRating] EQUALS ['org.springmodules.validation.valang.Person$CreditRating.EXCELLENT'] AND mapVars[age] > 18 : '' } | 905ns | 48ns | | { listVars[1] : validLastName(?) is true AND creditApproval(listVars[2], listVars[4]) is true WHERE listVars[0] IN 'Joe', 'Jack', 'Jill', 'Jane' AND listVars[3] IN ['org.springmodules.validation.valang.CreditStatus.PENDING'], ['org.springmodules.validation.valang.CreditStatus.FAIL'] AND listVars[4] EQUALS ['org.springmodules.validation.valang.Person$CreditRating.EXCELLENT'] AND listVars[2] > 18 : '' } | 575ns | 43ns | | { vars[1] : validLastName(?) is true AND creditApproval(vars[2], vars[4]) is true WHERE vars[0] IN 'Joe', 'Jack', 'Jill', 'Jane' AND vars[3] IN ['org.springmodules.validation.valang.CreditStatus.PENDING'], ['org.springmodules.validation.valang.CreditStatus.FAIL'] AND vars[4] EQUALS ['org.springmodules.validation.valang.Person$CreditRating.EXCELLENT'] AND vars[2] > 18 : '' } | 563ns | 40ns |
By specifying the 'className' property, bytecode will be generated for each method being called to avoid reflection. This gives a significant performance improvement. The default date parser provides support for a number of different date literals, and also has support for shifting and manipulating dates. Below are a few examples, but see the DefaultDateParser for more detailed information. © 2008-2012 David Winterfeldt. All rights reserved.
|