'FRAMEWORK/SPRING'에 해당되는 글 39건

  1. 2014.11.05 @ModelAttribute와 @RequestParam의 차이점
  2. 2014.09.26 Bean 정의시 id vs name
  3. 2014.09.25 스프링 설정파일과 소스코드(java, jsp)에서 properties 참조
  4. 2014.09.25 util:properties, properties.xml 사용하기
  5. 2014.09.25 스프링 ContextLoaderListener 의 역할
  6. 2014.04.18 mybatis mapper 방식 적용
  7. 2013.12.17 스프링 2.0 레퍼런스
  8. 2013.12.15 static 메서드 또는 자바 에서 spring 빈 가져오기
  9. 2013.10.17 멀티 쓰레드 환경에서 스프링빈 주의사항
  10. 2013.08.23 스프링 multi sourcedata 사용

@ModelAttribute와 @RequestParam의 차이점

FRAMEWORK/SPRING 2014. 11. 5. 10:24
요청 파라미터를 메소드 파라미터에서 1:1로 받으면 @RequestParam이고, 도메인 오브젝트나 DTO의 프로퍼티에 요청 파라미터를 바인딩해서 한번에 받으면 @ModelAttribute라고 볼 수 있다. 


@ModelAttribute는 서브밋된 폼의 내용을 저장해서 전달받거나,
다시 뷰로 넘겨서 출력하기 위해 사용되는 오브젝트이다.

즉, 검증(Validatioin) 작업이 추가적으로 진행된다. 
예를 들어 int 타입의 변수에 String 타입의 값을 넣을려고 할때 @ModelAttribute는 요청 파라미터를 적절히 타입변환을 시도한다. 만약 타입변환이 실패한다면 변환 중에 발생한 예외를 BindException 타입의 오브젝트에 담아서 컨트롤러에게 전달할 뿐이다. 
그 이유는 @ModelAttribute는 요청 파라미터의 타입이 모델 오브젝트의 프로퍼티 타입과 일치하는지를 포함한 다양한 검증 기능을 수행하기 때문이다. 
 ㅇㄴㅁㄹㅁㄴㅇㄹ


@ModelAttribute는 생략이 가능하다.

public String save(@ModelAttribute User user){ ... }  
== public String save(User user){ ... }


@ModelAttribute는 컨트롤러가 리턴하는 모델에 파라미터로 전달한 오브젝트를 자동으로 추가해준다.

모델의 이름은 기본적으로 파라미터 타입의 이름을 따른다.
MemberDto 클래스라면 memberDto라는 이름의 모델로 등록이 된다. 
다른 이름을 사용하고 싶다면 지정할 수도 있다.

public save(@ModelAttribute("user") MemberDto memberDto){ ... } 


출처 - http://kimddochi.tistory.com/87

:

Bean 정의시 id vs name

FRAMEWORK/SPRING 2014. 9. 26. 13:56

Spring 빈 정의할때 id 또는 name을 혼용해서 사용하는데 둘의 차이는 다음과 같다.


id 사용시 name과 다른점


XML내에서 Unique 해야함.

XML 에디터에서 중복 id발견시 validator가 체크해 줌

name사용시에는 Editor레벨에서 발견할 수 없고 Spring Runtime시에 중복 여부를 알수 있음


특수문자가 올수 없다. / , 등

name="/user/action.do" 라고 쓸수있지만 id="/user/action.do" 라고 쓸수 없다


출처 - http://mrjh.com/wiki/content.php?no=369&page=2

:

스프링 설정파일과 소스코드(java, jsp)에서 properties 참조

FRAMEWORK/SPRING 2014. 9. 25. 13:46

스프링 설정파일과 java, jsp 소스 코드 상에서 properties 파일의 값을 참조하는 방법 중에서<context:property-placeholder> 를 이용하는 방법과 SpEL 을 이용하는 방법에 대해서 정리하겠다.


1. <context:property-placeholder>


1) 서블릿 컨텍스트 파일 설정

<beans xmlns="http://www.springframework.org/schema/beans"   
  xmlns:xsi="http://www.w3.org/2001/XMLSchema-instance"   
  xmlns:p="http://www.springframework.org/schema/p"   
  xmlns:context="http://www.springframework.org/schema/context"   
  xmlns:mvc="http://www.springframework.org/schema/mvc
  xmlns:util="http://www.springframework.org/schema/util"
  xsi:schemaLocation="http://www.springframework.org/schema/beans   
       http://www.springframework.org/schema/beans/spring-beans-3.1.xsd   
       http://www.springframework.org/schema/util 
       http://www.springframework.org/schema/util/spring-util-3.1.xsd
       http://www.springframework.org/schema/context   
     
http://www.springframework.org/schema/context/spring-context-3.1.xsd 
       http://www.springframework.org/schema/mvc 
       http://www.springframework.org/schema/mvc/spring-mvc-3.1.xsd">  


<context:property-placeholder location="/WEB-INF/*.properties" />


2) 사용법

- xml 안에서 사용

<bean id="dataSource" class="org.springframework.jdbc.datasource.DriverManagerDataSource">

<property name="driverClassName" value="${jdbc.driver}" />
<property name="url" value="${jdbc.url}" />
<property name="username" value="${jdbc.username}" />
<property name="password" value="${jdbc.password}" />

</bean>


-- java 코드 내에서 사용

@Value("${jdbc.url}")

private String dbURL;


2. SpEL 이용


1) 서블릿 컨텍스트 파일 설정

<beans xmlns="http://www.springframework.org/schema/beans"   
  xmlns:xsi="http://www.w3.org/2001/XMLSchema-instance"   
  xmlns:p="http://www.springframework.org/schema/p"   
  xmlns:context="http://www.springframework.org/schema/context"   
  xmlns:mvc="http://www.springframework.org/schema/mvc
  xmlns:util="http://www.springframework.org/schema/util"
  xsi:schemaLocation="http://www.springframework.org/schema/beans   
       http://www.springframework.org/schema/beans/spring-beans-3.1.xsd   
       http://www.springframework.org/schema/util 
       http://www.springframework.org/schema/util/spring-util-3.1.xsd
       http://www.springframework.org/schema/context   
       http://www.springframework.org/schema/context/spring-context-3.1.xsd 
       http://www.springframework.org/schema/mvc 
       http://www.springframework.org/schema/mvc/spring-mvc-3.1.xsd">  


<util:properties id="db" location="/WEB-INF/database.properties" />  

<!-- SpEL 을 이용시에는 파일명으로 와일드문자(*)를 사용할 수 없다. 파일명을 다 입력해 주어야 한다. -->


2) 사용법

-- xml 안에서 사용

<bean id="dataSource" class="org.springframework.jdbc.datasource.DriverManagerDataSource">

<property name="driverClassName" value="#{db['jdbc.driver']}" />
<property name="url" value="#{db['jdbc.url']}" />
<property name="username" value="#{db['jdbc.username']}" />
<property name="password" value="#{jdbc.password']}" />

</bean>


-- java 코드 내에서 사용

@Value("#{db['jdbc.url']}")

private String dbURL;


* 톰캣7.0, jdk1.7, spring 3.1 에서 테스트 해 보니 <context:property-placeholder/> 이용하는 방법은 파일을 읽어들여서 키 값을 참조하는 시점에서 참조하지 못하는 오류가 일부 발생한다. 전체를 참조하지 못하는 것이 아니고 일부 키만 ㅡㅡ; 아직 원인을 찾아 해결하지는 몯했다.

SpEL을 이용하는 방법은 정상적으로 동작한다.


출처 - http://roadrunner.tistory.com/366

:

util:properties, properties.xml 사용하기

FRAMEWORK/SPRING 2014. 9. 25. 12:32

1. 우선 *.xml 파일을 생성했다. 문법은 간단하다


1.<?xml version="1.0" encoding="UTF-8"?>
2.<!DOCTYPE properties SYSTEM "http://java.sun.com/dtd/properties.dtd" >
3.<properties>
4. 
5.<comment>설명</comment>
6.<entry key="key">value</entry>
7. 
8.</properties>


2. dispatcher-servlet.xml 에 다음과 같은 내용을 추가해준다

util:properties를 사용하기 위해서 선언해주고, util:properties로 properties.xml을 등록한다.

01.<?xml version="1.0" encoding="UTF-8"?>
02.<beans xmlns:util="http://www.springframework.org/schema/util" xsi:schemalocation="   .... 생략 ....
05. 
06.<!-- properties.xml -->
07.<util:properties id="config" location="classpath:/conf/properties.xml">
08.</util:properties>
09.</beans>


3. SpEL을 이용해서 Java에서 사용하는 방법이다.

@Value("#{config['key']}") String picturePath;


4. applicationContext.xml과 같은 *.xml에서 사용하는 방법이다


1.<bean id="dataSource" class="org.apache.commons.dbcp.BasicDataSource" destroy-method="close">
2.<property name="driverClassName" value="#{config['key']}">
3.... 생략 ...
4.</property></bean>


5. JSP에서 사용하는 방법


1.<%@ taglib uri="http://www.springframework.org/tags" prefix="spring"%>
2.... 생략 ...
3.<spring:eval expression="@config['key']">
4.</spring:eval>


출처 -http://umsh86.tistory.com/41

:

스프링 ContextLoaderListener 의 역할

FRAMEWORK/SPRING 2014. 9. 25. 12:03

계층별로 나눈 xml 설정파일이 있다고 가정할 때,
web.xml에서 모두 load되도록 등록할 때 사용.
서블릿이전에 서블릿 초기화하는 용도록 쓰이며, 
contextConfigLocation라는 파라미터를 쓰면, 
Context Loader가 load할 수 있는 설정파일을 여거개 쓸 수 있다.

web.xml에 저 문장이 빠지게 되면 default로,
/WEB-INF/applicationContext.xml (spring 설정파일) 을 쓰게 된다.

[web.xml]

<context-param>
      <param-name>contextConfigLocation</param-name>
      <param-value>
           /WEB-INF/mars-ibatis.xml 
           /WEB-INF/mars-service.xml 
      </param-value>
</context-param>

<listener>
        <listener-class>org.springframework.web.context.ContextLoaderListener</listener-class>
</listener>


출처 - http://northface.tistory.com/entry/contextConfigLocation-and-orgspringframeworkwebcontextContextLoaderListener%EC%8A%A4%ED%94%84%EB%A7%81-%EC%84%A4%EC%A0%95%ED%8C%8C%EC%9D%BC%EC%9D%84-%EC%9D%BD%EA%B8%B0


<servlet>

    <servlet-name>aController</servlet-name>

    <servlet-class>org.springframework.web.servlet.DispatcherServlet</servlet-class>

        <init-param>

    <param-name>contextConfigLocation</param-name>

    <param-value>/WEB-INF/a-servlet.xml</param-value>

        </init-param>

     <load-on-startup>1</load-on-startup>

</servlet>


<servlet>

    <servlet-name>bController</servlet-name>

    <servlet-class>org.springframework.web.servlet.DispatcherServlet</servlet-class>

        <init-param>

    <param-name>contextConfigLocation</param-name>

    <param-value>/WEB-INF/b-servlet.xml</param-value>

        </init-param>

     <load-on-startup>1</load-on-startup>

</servlet>


위와 같은 경우 DispatcherServlet 은 각가 별도의 webapplicationcontext를 생성한다.

두 context 는 독립적이므로 각각의 설정파일에서 생성한 빈을 서로 사용할 수 없다.(공유X)


이때 동시에 필요한 의존성(공통빈) 이 있어야 하는 경우

ContextLoaderListener 을 사용하여 공통으로 사용할 빈을 설정할 수 있다.


<listener>

     <listener-class>org.springframework.web.context.ContextLoaderListener</listener-class>

</listener>


<context-param>

    <param-name>contextConfigLocation</param-name>

    <param-value>

        /WEB-INF/applicationContext.xml

        /WEB-INF/applicationContext_dao.xml

    </param-value>

</context-param>


ContextLoaderListener 와 DispatcherServlet 은 각각 webapplicationcontext 를 생성하는데

ContextLoaderListener 가 생성한 컨텍스트가 root 컨텍스트가 되고 DispatcherServlet  생성한 인스턴스는

root 컨텍스트를 부모로 하는 자식 컨텍스트가 된다.


자식 컨텍스트들은 root 컨텍스트의 설정 빈을 사용 할 수 있다.

그러기에 ContextLoaderListener 을 이용 공통빈 설정 가능.


출처 - http://blog.daum.net/_blog/BlogTypeView.do?blogid=0Tqpx&articleno=217&categoryId=0&regdt=20130911110427

:

mybatis mapper 방식 적용

FRAMEWORK/SPRING 2014. 4. 18. 16:24


MyBatis 적용 가이드

개요

전자정부 표준프레임워크 기반 MyBatis 적용 가이드이다.

ex-dataaccess-mybatis.zip


ex-dataaccess-mybatis.zip


Step 1. pom.xml 변경

표준프레임워크 dataaccess artifact version을 다음과 같이 2.7.0으로 변경한다.

<!-- 실행환경 라이브러리 -->
<dependency>
	<groupId>egovframework.rte</groupId>
	<artifactId>egovframework.rte.psl.dataaccess</artifactId>
	<version>2.7.0</version>
</dependency>

Step 2. 환경 설정

Step 2.1 XML 설정

Spring XML 설정 파일 상(ex: context-mapper.xml)에 다음과 같은 sqlSession bean 추가한다.

Ex) context-mapper.xml

<!-- SqlSession setup for MyBatis Database Layer -->
<bean id="sqlSession" class="org.mybatis.spring.SqlSessionFactoryBean">
	<property name="dataSource" ref="dataSource" />
	<property name="mapperLocations" value="classpath:/sqlmap/mappers/**/*.xml" />
</bean>

Step 2.2 mapper xml 작성

MyBatis 가이드에 따라 query xml 작성한다. (2.1의 예제 상 지정된 mapperLocations 위치)

Step 3. DAO 작성

DAO의 경우는 다음과 같이 3가지 방식이 가능하다.

방식설명비고
기존 DAO 클래스 방식@Repository 지정 및 EgovAbstractMapper extends 활용기존 iBatis와 같은 방식
Mapper interface 방식Mapper 인터페이스 작성 및 @Mapper annotation 지정@Mapper는 marker annotation(표준프레임워크 제공)
Annotation 방식query xml 없이 mapper 인터페이스 상 @Select, @Insert 등을 활용Dynamic SQL 등의 사용에 제약이 있음

3.1 기존 DAO 형태로 사용하는 경우

@Repository 지정된 class가 EgovAbstractMapper를 extends 하여 insert, update, delete, selectByPk, list 메소드를 활용한다.

@Repository("deptMapper")
public class DeptMapper extends EgovAbstractMapper {
 
    public void insertDept(String queryId, DeptVO vo) {
        insert(queryId, vo);
    }
 
    public int updateDept(String queryId, DeptVO vo) {
        return update(queryId, vo);
    }
 
    public int deleteDept(String queryId, DeptVO vo) {
        return delete(queryId, vo);
    }
 
    public DeptVO selectDept(String queryId, DeptVO vo) {
        return (DeptVO)selectByPk(queryId, vo);
    }
 
    @SuppressWarnings("unchecked")
    public List<DeptVO> selectDeptList(String queryId, DeptVO searchVO) {
        return list(queryId, searchVO);
    }
}

3.2 Mapper interface 사용 방식

Mapper 인터페이스 작성 시 다음과 같이 @Mapper annotation 사용한다.

(패키지를 포함하는 클래스명 부분이 mapper xml 상의 namespace가 선택되고 인터페이스 메소드가 query id로 호출되는 방식)

@Mapper("employerMapper")
public interface EmployerMapper  {
 
    public List<EmpVO> selectEmployerList(EmpVO vo);
 
    public EmpVO selectEmployer(BigDecimal empNo);
 
    public void insertEmployer(EmpVO vo);
 
    public int updateEmployer(EmpVO vo);
 
    public int deleteEmployer(BigDecimal empNo);
 
}

이 경우는 xml 설정 상에 다음과 같은 MapperConfigurer 설정이 필요하다.

Ex: context-mapper.xml

<bean class="egovframework.rte.psl.dataaccess.mapper.MapperConfigurer">
	<property name="basePackage" value="egovframework.rte.**.mapper" />
</bean>

basePackage에 지정된 패키지 안에서 @Mapper annotation을 스캔하는 설정이다.

⇒ @Mapper로 지정된 인터페이스를 @Service에서 injection 하여 사용함

public class EmployerMapperTest {
 
    @Resource(name = "employerMapper")
    EmployerMapper employerMapper;
 
@Test
    public void testInsert() throws Exception {
        EmpVO vo = makeVO();
 
        // insert
        employerMapper.insertEmployer(vo);
 
        // select
        EmpVO resultVO = employerMapper.selectEmployer(vo.getEmpNo());
 
        // check
        checkResult(vo, resultVO);
    }

3.3 Annotation 사용 방식

mapper xml 작성 없이 Mapper 인터페이스 상에 @Select, @Insert, @Update, @Delete 등의 annotation을 통해 query가 지정되어 사용된다.

@Mapper("departmentMapper")
public interface DepartmentMapper  {
 
	@Select("select DEPT_NO as deptNo, DEPT_NAME as deptName, LOC as loc from DEPT where DEPT_NO = #{deptNo}")
    public DeptVO selectDepartment(BigDecimal deptNo);
 
	@Insert("insert into DEPT(DEPT_NO, DEPT_NAME, LOC) values (#{deptNo}, #{deptName}, #{loc})")
    public void insertDepartment(DeptVO vo);
 
	@Update("update DEPT set DEPT_NAME = #{deptName}, LOC = #{loc} WHERE DEPT_NO = #{deptNo}")
    public int updateDepartment(DeptVO vo);
 
	@Delete("delete from DEPT WHERE DEPT_NO = #{deptNo}")
    public int deleteDepartment(BigDecimal deptNo);
 
}

⇒ 이 경우는 별도의 mapper xml을 만들 필요는 없지만, dynamic query를 사용하지 못하는 등의 제약사항이 따름


출처 -http://www.egovframe.go.kr/wiki/doku.php?id=egovframework:rte2:psl:dataaccess:mybatisguide

:

스프링 2.0 레퍼런스

FRAMEWORK/SPRING 2013. 12. 17. 17:41

http://openframework.or.kr/framework_reference/spring/ver2.x/html/index.html


reference_spring_2.x.zip


:

static 메서드 또는 자바 에서 spring 빈 가져오기

FRAMEWORK/SPRING 2013. 12. 15. 02:59

스프링을 사용하다보면 부득이하게 “spring bean“을 일반 자바 또는 “static 메서드“로
선언된 곳에서 spring bean을 호출을 해야 하는 경우가 있습니다.

예를 들어서 “Servlet Filter“에서 “특정 spring bean”사용 한다 거나 특히, “유틸리티” 기능을
하는 클래스들(“주로 static으로 메서드가 선언된 클래스“)에서 사용할 경우가 대표적인
예라고 할 수 있습니다.

위와 같은 경우 어떻게 사용하는지에 대해서 “recipe“를 알려 드리겠습니다.

(1) 스프링 빈 설정

먼저 호출되어질 “스프링 빈“을 간단하게 설정하도록 하겠습니다.

SampleBean.java

1
2
3
4
5
6
7
8
9
10
11
12
13
14
15
16
17
18
19
20
21
22
23
24
25
/*
 * Revision History
 * Author                    Date              Description
 * ------------------        --------------  ------------------
 * @beyondj2ee for twitter   2012. 12. 6
 */
package pe.beyondj2ee.springframework.sample
 
public class SampleBean {
    //~ Static fields/initializers ~
    //~ Instance fields ~
    //~ Constructors ~
    //~ Implementation Method (interface/abstract) ~
    //~ Self Methods ~
    /**
     * 메세지를 리턴 한다.
     *
     * @return the string
     * @throws Exception the exception
     */
    public String echo () throws Exception {
        return "My Bean!!!";
    }
    //~ Getter and Setter ~
}

위의 클래스를 스프링 빈으로 설정 합니다.
bean.xml

(2) web.xml 설정

아래와 같이 “web.xml”에 스프링 컨텐스트를 설정 합니다.
여기서 중요한 부분은 “RequestContextListener” 리스너 입니다.
해당 리스너의 역할은 “현재 요청되어진 “HttpServletRequest” 객체의 레퍼런스
정보를 저장하는 기능을 갖고 있습니다.
즉 , current request에 대한 정보를 노출시켜주는 기능 입니다.

1
2
3
4
5
6
7
8
9
10
11
12
13
<context-param>
    <param-name>contextConfigLocation</param-name>
    <param-value>classpath*:/bean.xml</param-value>
</context-param>
 
<listener>
    <listener-class>
        org.springframework.web.context.ContextLoaderListener
    </listener-class>
</listener>
<listener
    <listener-class>org.springframework.web.context.request.RequestContextListener</listener-class>
</listener>

(2) utility 클래스 작성

“스프링 빈”를 호출해서사용하는 “utility 클래스” 입니다.
“RequestContextHolder” 클래스를 사용해서, 현재 요청한 “HttpServletRequest”
객체를 가져 옵니다.
나머지 코드는 기본적으로 스프링 빈을 가져오는 코드들 입니다.

1
2
3
4
5
6
7
8
9
10
11
12
13
14
15
16
17
18
19
20
21
22
23
24
25
26
27
28
29
30
31
32
33
34
35
36
37
38
39
40
41
42
43
44
45
46
47
48
49
50
51
52
53
54
55
</pre>
/*
 * Revision History
 * Author Date Description
 * ------------------ -------------- ------------------
 * @beyondj2ee for twitter 2012. 12. 6
 */
package pe.beyondj2ee.springframework.sample;
 
import javax.servlet.ServletContext;
import javax.servlet.http.HttpServletRequest;
import javax.servlet.http.HttpSession;
 
import org.springframework.web.context.WebApplicationContext;
import org.springframework.web.context.request.RequestContextHolder;
import org.springframework.web.context.request.ServletRequestAttributes;
import org.springframework.web.context.support.WebApplicationContextUtils;
 
/**
 * 메세지를 리턴하는 클래스.
 */
public class StaticUtil {
 //~ Static fields/initializers ~
 //~ Instance fields ~
 //~ Constructors ~
 //~ Implementation Method (interface/abstract) ~
 //~ Self Methods ~
 /**
 * 메세지 정보를 리턴 한다.
 *
 * @return the message
 * @throws Exception the exception
 */
 public static String getMessage () throws Exception {
 
 //현재 요청중인 thread local의 HttpServletRequest 객체 가져오기
 HttpServletRequest request = ((ServletRequestAttributes) RequestContextHolder.getRequestAttributes()).getRequest();
 
 //HttpSession 객체 가져오기
 HttpSession session = request.getSession();
 
 //ServletContext 객체 가져오기
 ServletContext conext = session.getServletContext();
 
 //Spring Context 가져오기
 WebApplicationContext wContext = WebApplicationContextUtils.getWebApplicationContext(conext);
 
 //스프링 빈 가져오기 & casting
 SampleBean sBean = (SampleBean)wContext.getBean("sampleBean");
 
 return sBean.echo();
 }
 //~ Getter and Setter ~
 
}

(2) controller 적용하기

컨트롤러에서 위의 “utility 클래스“를 호출 합니다.

1
2
3
4
5
6
7
8
9
10
11
12
13
14
15
16
17
18
19
20
21
22
23
24
25
26
27
28
29
30
31
32
33
34
35
36
37
38
/*
 * Revision History
 * Author                     Date              Description
 * ------------------         --------------  ------------------
 * @beyondj2ee for twitter  2012. 12. 6
 */
package pe.beyondj2ee.springframework.sample;
 
import org.slf4j.Logger;
import org.slf4j.LoggerFactory;
import org.springframework.stereotype.Controller;
import org.springframework.web.bind.annotation.RequestMapping;
import org.springframework.web.bind.annotation.RequestMethod;
 
@Controller
@RequestMapping("/static")
public class BasicController extends AbstractController {
    // ~ Static fields/initializers ~
    /** this logger. */
    private static final Logger logger = LoggerFactory.getLogger(BasicController.class);
 
    // ~ Instance fields ~
    // ~ Constructors ~
    // ~ Implementation Method (interface/abstract) ~
    // ~ Self Methods ~
 
    /**
     * 기본 요청을 처리하는 컨트롤러.
     *
     * @return the model and view
     * @throws Exception the exception
     */
    @RequestMapping(method = RequestMethod.GET)
    public void handleGET() throws Exception {
        logger.info("message : " + StaticUtil.getMessage());
    }
    // ~ Getter and Setter ==============================================================================================
}

컨트롤러를 실행하면 아래와 같이 결과가 출력 됩니다.
이미지 1

Conclusion

해당 방법은 “HpptServletRequest” 객체를 참조하기 어려운 클래스에서 호출시에
좋은 “tip“이 될것 입니다. 참고로 “Web Application“에서만 해당 된다는 점을
유념 하시기 바랍니다.


출처 - http://beyondj2ee.wordpress.com/2012/12/06/static-%EB%A9%94%EC%84%9C%EB%93%9C-%EB%98%90%EB%8A%94-%EC%9E%90%EB%B0%94-%EC%97%90%EC%84%9C-spring-%EB%B9%88-%EA%B0%80%EC%A0%B8%EC%98%A4%EA%B8%B0/

'FRAMEWORK > SPRING' 카테고리의 다른 글

mybatis mapper 방식 적용  (0) 2014.04.18
스프링 2.0 레퍼런스  (0) 2013.12.17
멀티 쓰레드 환경에서 스프링빈 주의사항  (0) 2013.10.17
스프링 multi sourcedata 사용  (0) 2013.08.23
Spring Bean Life Cycle  (0) 2013.08.20
:

멀티 쓰레드 환경에서 스프링빈 주의사항

FRAMEWORK/SPRING 2013. 10. 17. 13:24

얼마전 “CBT Live” 테스트(실제 서비스 장비에서 성능/기능 통합 테스트)를 하면서
발생한 문제를 공유하고자 합니다.

(1) 증상

외부 시스템에 “A“라는 사용자 정보를 요청 했는데, 확인을 해보니 “B” 사용자
정보가 등록이 되었습니다.

Local” 개발 환경에서는 전혀 그런 증상이 없었고, 실제로 서비스를 하려는
CBT” 개발 환경에서 “성능/기능 테스트“를 하면서 해당 이슈가 발생을 하였습니다.

그래서 “log“를 확인했습니다.
그런데 이상한 점이 “요청을 위임하는 모듈“에서는 정확히 “A” 사용자 정보
가 있었고, “실제 서버와 통신하는 모듈“에서 “B” 사용자 정보를 호출 했습니다.
확인 결과 “Spring Bean“에 대한 개발자의 이해 부족으로 발생된 에러 였습니다.
해결 방법을 말씀 드리기전에 “Spring Application Context“에 대해서
간략하게 설명을 드리겠습니다.

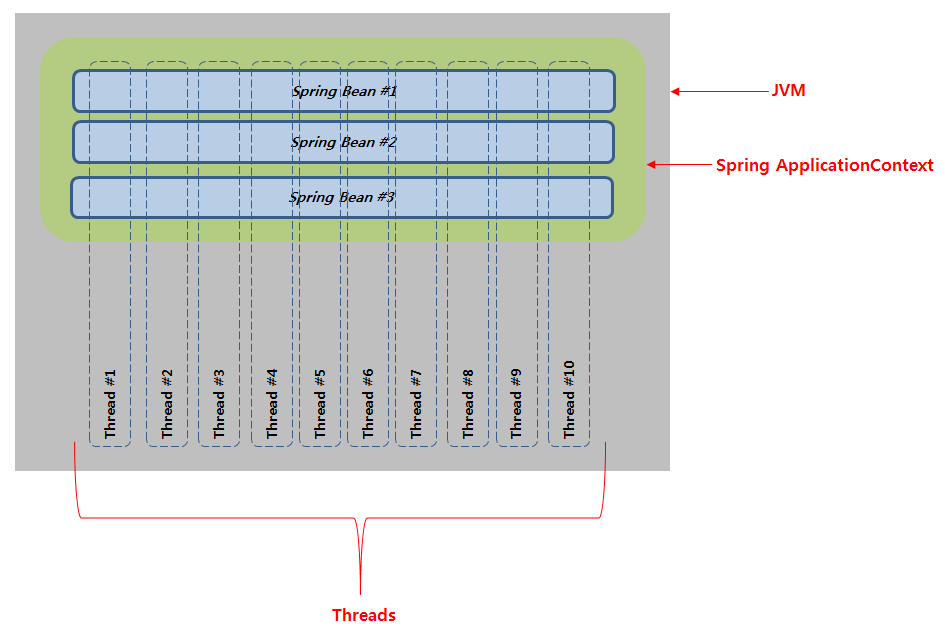
(2) Spring Big Picture

아래의 그림은 “멀티 쓰레드 환경에서 스프링 빈” 관계를 직접 그려봤습니다.

이미지 12

SpringFramework” 기반으로 만든 “어플리케이션”은 기동시 “ApplicationContext“라는
Static Sharing Pool“를 생성 합니다.
좀더 쉽게 설명을 하면 하나의 “싱글톤” 패턴 방식의 구현된 오브젝트가 생성 됩니다.
(정확히는 “싱글톤 패턴”은 아닙니다. 이해를 돕기 위해서)

이렇게 생성된 “ApplicationContext” 영역에 “POJO(Plain Old Java Object) 클래스
들의 오브젝트들이 등록이 됩니다.

“POJO” 클래스는 그냥 “new 하면 스스로 생성”이 가능한 클래스의 형태를 말합니다.

이렇게 등록된 오브젝트를 “Spring Bean“이라고 합니다.
비록 “POJO” 클래스에 “static“으로 선언을 하지 않더라도, “ApplicationContext
가 이미 “Sharing“이 되어 있기때문에 “당연히 등록된 Bean”로
멀티 Thread 환경“에서 서로 공유를 하게 됩니다.
(물론 prototype일 경우는 매번 생성을 합니다.)

위에 그림을 보면 “JVM”에서 하나의 공유 “ApplicationContext”가 생성이 되며
“Spring Bean #1″, “Spring Bean #2″, “Spring Bean #3″ 등
3개의 “Bean”이 등록이 되어 있고, “1번부터 10번 Thread 모두 
동일한 Bean 오브젝트“를 사용을 합니다.

여기까지는 “SpringFramework“를 개발하신 분들은 알고 계실 겁니다.

문제는 개발자들이 Spring Bean의 멤버변수 또한 멀티쓰레드 환경에서
공유가 된다는 것을 간과한다는 것입니다.

이러한 실수는 “Thread Safe” 한 프레임웍(Servlet, Netty Handler, Camel Router, Spring Controller)들에 대한 오해 때문입니다.

문서를 보면 당연히 “Thread Safe“하다고 명시된 부분만을 확인하지, 실제 어디까지
“Thread Safe“하지 않는지 확인을 잘 안한다는 것입니다.

대부분 public 메서드”안에서 선언된 로컬 변수가 “Thread Safe”한거지 “멤버변수”
까지 “Thread Safe” 하다라는 것입니다. 즉 정확한 확인이 필요 합니다.

(3) 해결 방법 및 코딩 가이드

아래는 개발자가 문제를 일으켰단 소스 입니다.

1
2
3
4
5
6
7
8
9
10
11
12
13
14
15
16
@Service
public class MemberController{
 
    @Autowired
    private UserRepository userRepository;
 
    private Member member = new Member();
 
    public void createUser(String id, String name) throws Exception {
 
        member.setID(id);
        member.setName(name);
        userRepository.insertUser(member);
 
    }
}

7 Line : 멤버변수 “Member” 오브젝트를 생성 합니다.
11 Line : 파라미터 id를 member 오브젝트의 id 속성에 값 설정을 합니다
12 Line : 파라미터 name를 member 오브젝트의 name 속성에 값 설정을 합니다

소스를 보면 위에서 언급한것 처럼 “멤버변수“를 “Bean” 최초 생성시 초기화를 합니다.
그 다음 부터는 “createUser” 메서드에서 계속 재사용을 합니다.
당연히 “createUser” 메서드는 “Thread Safe” 합니다. 하지만 문제는 “멤버변수” 입니다.

해당 코드를 아래와 같이 “리팩토링” 해야 합니다.

1
2
3
4
5
6
7
8
9
10
11
12
13
14
@Service
public class MemberController{
 
    @Autowired
    private UserRepository userRepository;
 
    public void createUser(String id, String name) throws Exception {
        Member member = new Member();
        member.setID(id);
        member.setName(name);
        userRepository.insertUser(member);
 
    }
}

8 Line :  멤버변수 부분을 삭제하고, 대신 “createUser” 메서드에서 생성을 합니다.
코드는 상당히 간단 합니다. 간혹 물어 보시는 분들이 “저렇게 매번 생성하면” 메모리에
부담이 있는것 아니냐 하시는 분들이 있습니다.

createUser” 메서드가 종료되면 자연스럽게 “member” 오브젝트는 “GC
대상이 됩니다.

(4) Conclusion

멀티 쓰레드 환경에서 스프링빈 주의사항“에 대해서 말씀 드렸습니다.
사실 별거 아닐수 있지만 상당히 주의를 요하며, 개발시에 팀원들에게 숙지를
해야 하며, 팀장 또는 선임 개발자들은 “코드 Inspection“시 반드시
이 부분에 대한 점검이 필요 합니다.

왠만하면 “스프링”에서 “멤버변수”는 “Injection“에 사용하는 “bean“일 경우만
사용하도록 권고 드립니다.

제가 왜 이렇게 강조를 하는 이유는

디버깅이 하기가 너무 어렵다는 이유 입니다. 대부분 개발시에는
개발자 환경은 멀티 쓰레드 환경이 아닙니다. 그렇기 때문에

발견이 거의 되지를 않습니다.  대부분 개발 후반에 성능 테스트
할때 발견이 됩니다.

특정 서버가 CPU를 많이 차지 하거나, 메모리 사용률을 많이 점유하면
thread dump를 떠서 확인을 하지만 이렇게 thread간 race condition
깨진 경우는 dump떠서 확인이 힘들고, 특히나 여러 클래스에 그렇게
사용을 하면 더 찾기가 어렵습니다.

최악의 경우는 프로젝트 막바지는 “멘붕” 상태이기 때문에 “선무당”이 사람 잡는다고
전체 서버에 JDK를 다른 버전을 설치 하거나, WAS를 다시 설치 하거나, 심지어 
OS 커널 또는 버전을 바꿔야 한다든지 더 큰 상황으로 치닫을수 있습니다.

또한 수십, 수백명이 이런 코드를 양산될 경우는 더더욱 트러블 슈팅이 어렵습니다.
이점 유념하시고 개발 하셨으면 합니다.


출처 - http://beyondj2ee.wordpress.com/2013/02/28/%EB%A9%80%ED%8B%B0-%EC%93%B0%EB%A0%88%EB%93%9C-%ED%99%98%EA%B2%BD%EC%97%90%EC%84%9C-%EC%8A%A4%ED%94%84%EB%A7%81%EB%B9%88-%EC%A3%BC%EC%9D%98%EC%82%AC%ED%95%AD/

:

스프링 multi sourcedata 사용

FRAMEWORK/SPRING 2013. 8. 23. 16:21

Spring-2.5.6 에서 여러개의 DataSource를 사용하는 방법을 소개한다.


다음과 같이 두개의 데이터 소스가 선언되어 있을 때 자동 주입(Inject)하고자 한다면 
<context:component-scan base-package="com.kyobobook.kflow" />

  <!-- ===================================================================== -->
  <!-- Transaction Configuration                                             -->
  <!-- ===================================================================== -->
  <aop:config proxy-target-class="true" />

  <bean id="riUniTestDataSource"  class="org.apache.commons.dbcp.BasicDataSource" destroy-method="close">
    <qualifier value="riUniTestDataSource" />
    <property name="driverClassName" value="com.sybase.jdbc3.jdbc.SybDriver" />
    <property name="url" value="jdbc:sybase:Tds:192.168.0.15:3000" />
    <property name="connectionProperties" value="charset=eucksc;" />
    <property name="username" value="dev_kf" />
    <property name="password" value="dev_kf" />
  </bean>

  <bean id="riDataSource" class="org.apache.commons.dbcp.BasicDataSource" destroy-method="close">
    <qualifier value="riDataSource" />
    <property name="driverClassName" value="com.sybase.jdbc3.jdbc.SybDriver" />
    <property name="url" value="jdbc:sybase:Tds:192.168.0.6:3000/biltis" />
    <property name="connectionProperties" value="charset=eucksc;" />
    <property name="username" value="dev_kb" />
    <property name="password" value="dev_kb" />
  </bean>

첫번째 @Resource annotation을 사용할 수 있다.
    @Resource(name = "riDataSource")
    public void setDataSource(DataSource dataSource) {
        super.buildSqlMapClient(dataSource);
    }

두번째 방법은 @Autowired와 @Qualifier 를 사용하는 방법이다.
    @Autowired
    public void setDataSource(@Qualifier("riDataSource") DataSource dataSource) {
        super.buildSqlMapClient(dataSource);
    }

위 두가지 방법의 차이점은 DI(Dependency Injection)를 어떻게 할 것인가이다. 다음은 Anyframe에서 설명하는 Dependency Injection 에 대한 내용이다.(설명이 잘되어 있어서 퍼왔으나 라이센스가 문제가 된다면 링크로 변경할 것입니다.)

특정 Bean의 기능 수행을 위해 다른 Bean을 참조해야 하는 경우 사용하는 Annotation으로는 @Autowired 또는 @Resource가 있다.
  • @Autowired

  • Spring Framework에서 지원하는 Dependency 정의 용도의 Annotation으로, Spring Framework에 종속적이긴 하지만 정밀한 Dependency Injection이 필요한 경우에 유용하다.

  • @Resource

  • JSR-250 표준 Annotation으로 Spring Framework 2.5.* 부터 지원 가능한 Annotation이다. Annotation 사용으로 인해 특정 Framework에 종속적인 어플리케이션을 구성하지 않기 위해서는 @Resource를 사용할 것을 권장한다. @Resource를 사용하기 위해서는 클래스패스 내에 jsr250-api.jar 파일이 추가되어야 함에 유의해야 한다.
다음은 @Resource를 사용한 예이다.
@Service
public UserServiceImpl implements UserService {
    @Resource
    private UserDAO userDAO;
}

@Autowired와 @Resource를 사용할 수 있는 위치는 다음과 같이 약간의 차이가 있으므로 필요에 따라 적절히 사용하면 된다.
  • @Autowired : 필드, 생성자, 입력파라미터가 여러개인 메소드(@Qualifier는 메소드의 파라미터)에 적용 가능
  • @Resource : 필드, 입력 파라미터가 한 개인 빈 프로퍼티 setter 메소드에 적용가능
@Autowired나 @Resource를 필드에 직접 정의하는 경우 별도 setter 메소드는 정의하지 않아도 된다.


Type-driven Injection

@Autowired는 기본적으로 type-driven injection 이다. 타입으로 참조할 빈을 찾았을 때 같은 타입의 빈이 여러 개 검색되었을 경우, @Qualifier annotation을 사용하여 구분할 수 있도록 해준다. 

다음은 @Qualifier를 사용한 예이다.
@Service
public ProductService {
    @Autowired
    @Qualifier("electronics")
    private ProductCategory productCategory;
}
Qualifier를 정의하는 방법에는 다음과 같이 두가지가 있다.
  • XML을 사용한 정의
  • <bean class="anyframe.sample.springmvc.annotation.web.
    SimpleProductCategory">
        <qualifier value="electronics"/>
        <!-- inject any dependencies required by this bean -->
    </bean>
    
    <bean class="anyframe.sample.springmvc.annotation.web.
    SimpleProductCategory">
        <qualifier value="cosmetics"/>
        <!-- inject any dependencies required by this bean -->
    </bean>
    		
  • Annotation을 사용한 정의
  • @Component
    @Qualifier("electronics")
    public class ElectronicsProductCategory implements ProductCategory {
    	//...
    }

기본적으로 @Autowired가 적용된 프로퍼티는 필수이기 때문에 반드시 해당 빈이 존재해야 하지만, required 속성을 false로 설정하는 경우에는 해당되는 Bean을 찾지 못하더라도 에러가 발생하지 않는다.
@Service
public UserService implements UserService {
    @Autowired(required=false)
    private UserDAO userDAO;
}

Naming Auto Wired Dependencies

@Resource annotation은 다음과 같은 경우에 사용한다.
  • Bean name으로 Dependency Injection을 하고자 하는 경우
  • Type-driven injection을 할 수 없는 Collection이나 Map 타입의 빈
@Resource를 사용하는 경우 참조되는 Bean은 변수명을 Bean Name으로 하여 Spring 컨테이너에 의해 자동으로 인지되는데, 변수명을 이용하여 참조 관계에 놓인 Bean을 찾았는데 해당 Bean이 없는 경우에는 클래스 타입을 이용하게 된다. 참조 관계에 놓인 Bean의 Name을 직접 명시하고자 하는 경우에는 다음과 같이 'name' 속성을 부여할 수 있다.
@Service
public UserServiceImpl implements UserService {
    @Resource (name="uDAO")
    private UserDAO userDAO;
}

: